
Predator X: User Guide
(Currently Under Construction)
The below Predator X: User Guide has been designed to help set up and utilize the Predator X Order Entry System on NinjaTrader8.
We are constantly updating this Guide as new updates are released. If you are looking for something, or would like further information, please reach out to us at [email protected] or you can connect with us over on Discord and we can assist you one on one or get a new Video uploaded for our entire Predator community.
Getting Started / Helpful Tips
Getting Started / Helpful Tips for using the Predator X Order Entry
Time Stamps
Download & Update The Predator X Order Entry
Step-By-Step Tutorial on how to download, and update the Predator X Order Entry
Free Trial Information
The Predator is available for you to try for a full 7 days before you purchase. If you require an extension for your trial simply send us an email at [email protected] and we can extend for you on a 7 day period.
Using the link: https://discord.gg/2YU9GDme8j you will be redirected to our Discord Channel.
Simply join our free server on Discord
Scroll down to the #predator-info room and click on the most recent file to download the latest version

*If you get a Trial Expiry Message. Send your Machine ID to: [email protected].
Please copy and paste your machine ID – NO SCREENSHOTS!
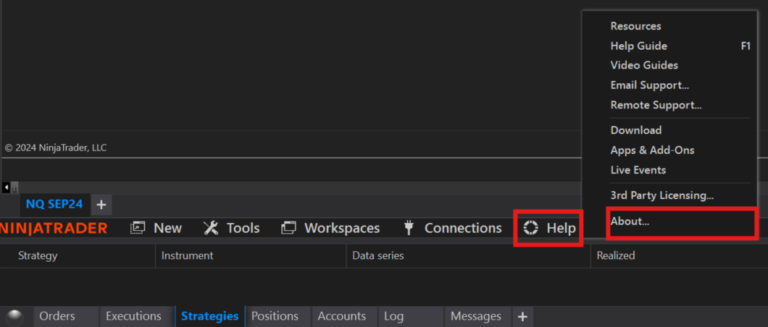
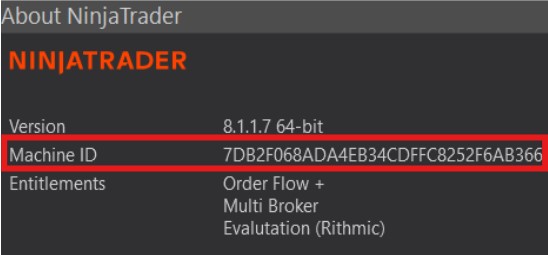
To locate your machine ID – Go to your NT8 Control Panel – Help – About
Importing & Loading As A First Time User
If this is your first time loading the Predator X Order Entry onto your NinjaTrader
Head down to your NT8 Control Panel
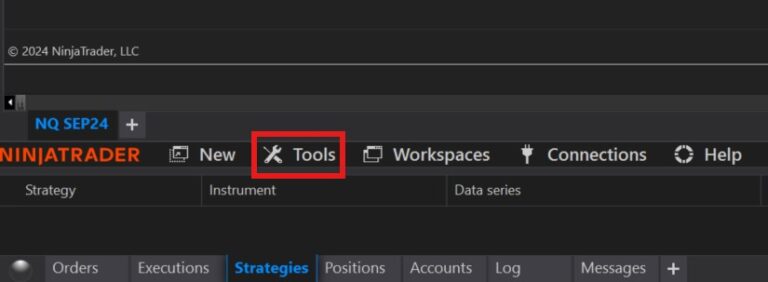
Click on “Tools” – Select Import and NinjaScript Addon
Once prompted, select the whole Predator X Order Entry folder
Do not extract or load the download any other way as it will not load properly to NinjaTrader!

Once the file has been imported successfully, you will see the below pop up from Ninja
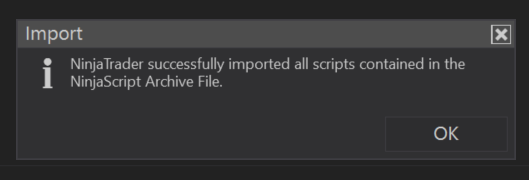
Make sure to RESTART NT8 after importing!
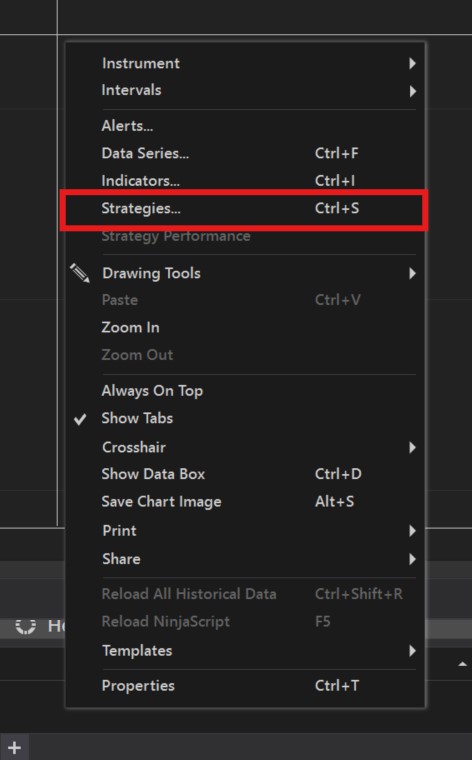
Once imported, right click on your chart and select “Strategies”
Always load the strategy by Right Clicking on the chart and selecting strategies.
NEVER load by Right Clicking on the NT8 Control Panel and selecting Strategies, this will cause problems when enabling your strategy even if all of your Parameters and accounts are correct.
On the left side of your Strategies window, you’ll want to click the TradeSaberPredator folder, and then select PredatorXOrderEntry
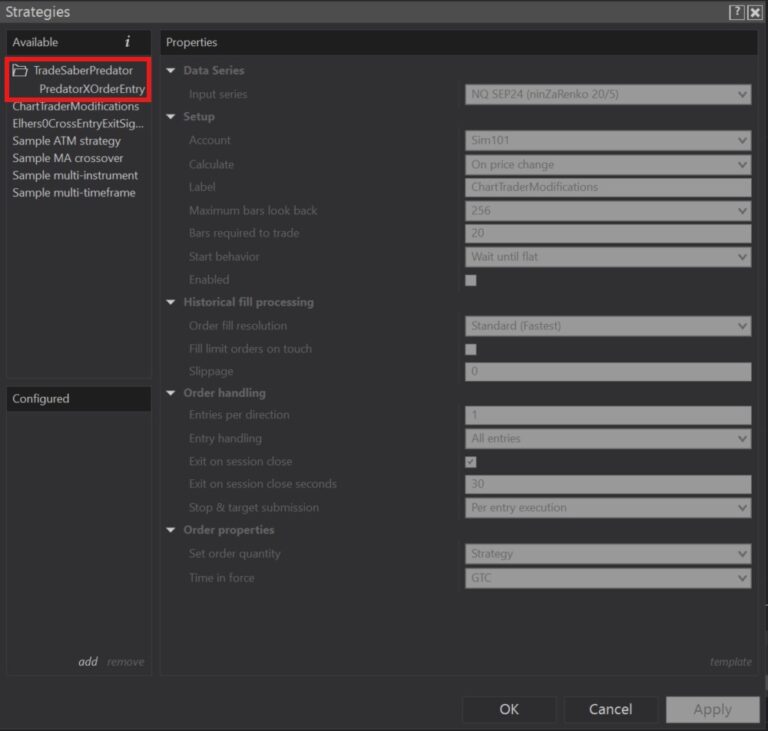
Here you will then set up all your properties and once you’re ready click “Apply” and then “Ok”
Head down to your NT8 Control Panel and select your “Strategies” tab. You’ll see the Predator X Order Entry Listed and all you’ll need to do is check “Enabled” and your Predator will show up.
This is the step that fully enables your strategy for trading.

*Something To keep in mind* Always be sure to verify the Account listed under Account Display to ensure that you’re trading with the correct account.
**Please also ensure that you are only loading one instance per chart.
If you are trading multiple instruments, load them in different charts. Either in a new window or a different tab
*Make sure to clear your control panel and load a new strategy at the start of each trading day to avoid any possible sync issues.
Updating To Latest Version As A Lifetime Member
Now as a Lifetime Predator Member, you’ll have 2 ways to update to the latest version.
Just like the Free Trial, you can access the most recent Predator X Order Entry file on Discord. Scroll down to the #predator-info room and click on the most recent file to download the latest version

But as a Lifetime Member you will also have full access to all downloads on tradesaber.com.
On our website, head to the “Predator Series” and select “Purchased Downloads”

Once loaded up you’ll see the download option for the latest version.
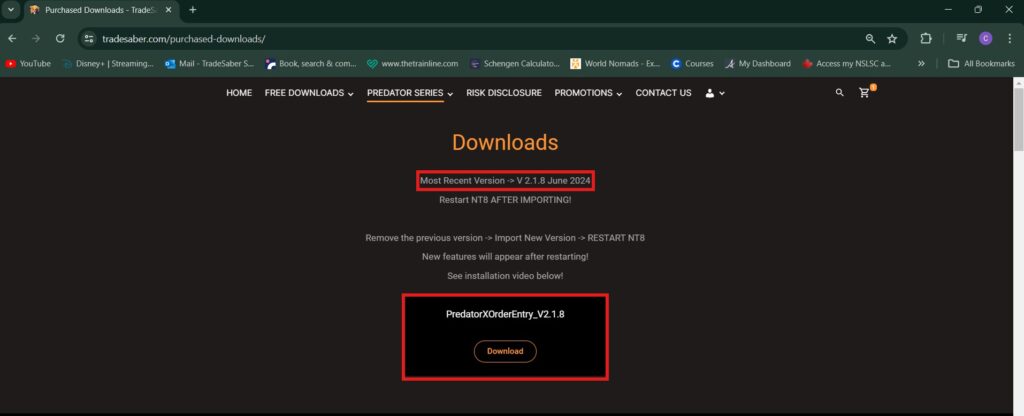
*Something To Keep In Mind* We migrated to a new website provider and anyone who had an account on our old website prior to May 11th will need to create a new account before accessing the Purchased Downloads Section.
To create a new account, head over to the “Person Icon” and click on “Create Account”

From here you’ll fill out a few registration questions and create your new password.
Also make sure to check the box to confirm you are indeed, NOT a robot.
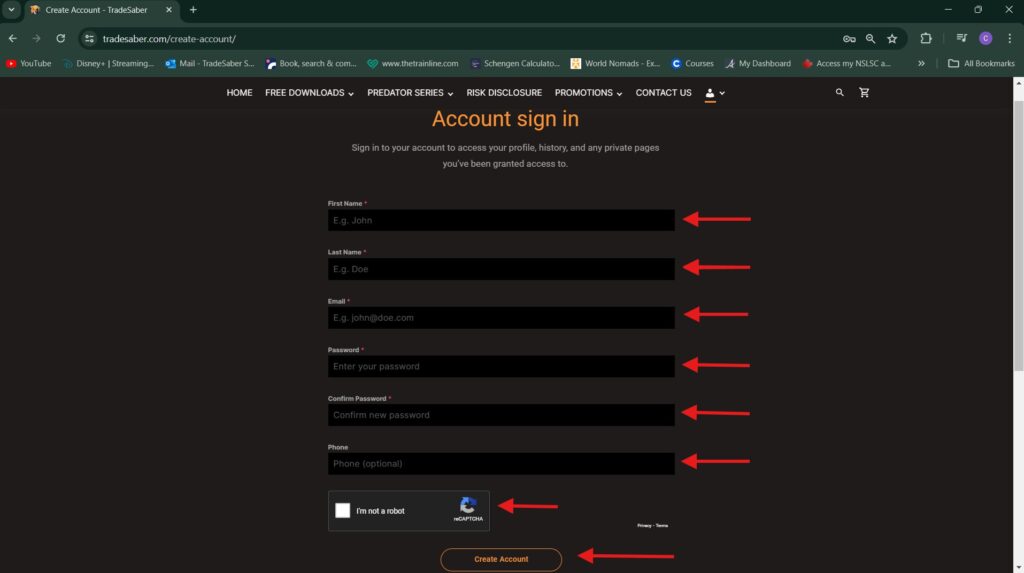
Once submitted, you will need to send a brief email to [email protected] with your First Name, Last Name, and email you used to register.
Within 24-48 hours we will grant you access and you will then be able to have full access to the Purchased Downloads.
Now you have downloaded the latest version, lets clear out any previous versions to get you ready for install.
- Delete any saved Templates and clear all Strategies from your NT8 Control Panel
For any templates you have that you want to be saved, create a new folder anywhere it will be easiest for you to find.
Head to the file path below and copy the whole TradeSaber file and paste into the new folder you created.

Take a look at your NT8 Control Panel and if you have a Predator version there, click on it and delete.

- Delete any previous version of the Predator you have downloaded.
To complete this step, head down to “Tools” on your NT8 Control Panel and select “Remove NinjaScript Assembly”
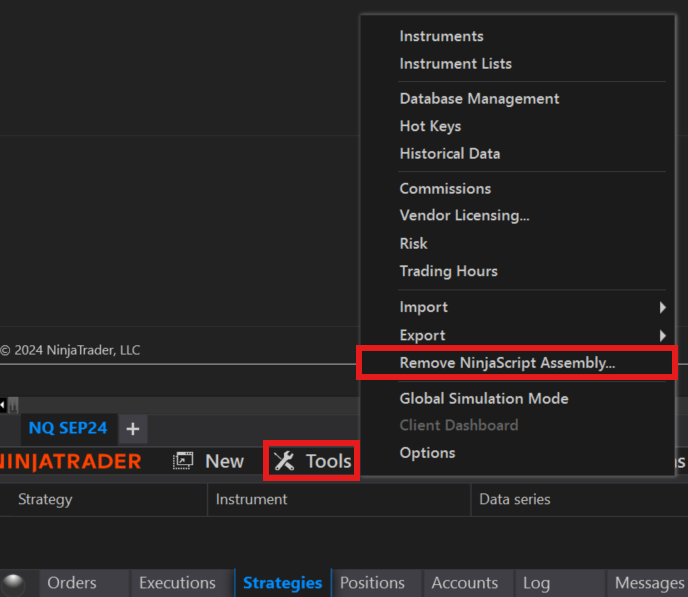
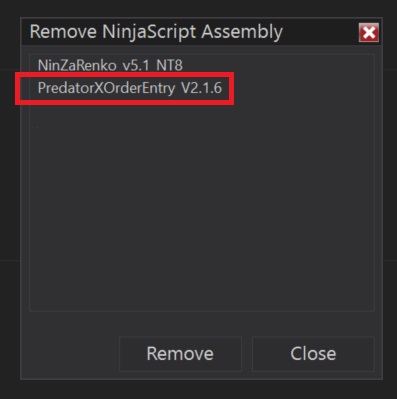
Once loaded, be sure to delete any files linked to an old version of the Predator X Order Entry.
Now that we have a clean slate we are ready in import the new version.
You’ll import the same way as you had for previous versions. If you would like any refreshers on some of the steps, you can follow along with the steps listed in the “Import and Loading As A First Time User” in the above drop down.
ALWAYS Restart NinjaTrader After Updating!!
Always make sure to reload NinjaTrader so that all the new features in the download load properly.
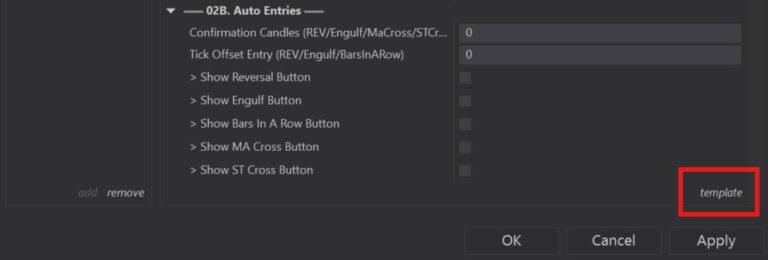
Any saved templates that you kept will be found by clicking the “Templates” option below and selecting the file to upload.
Troubleshooting
Chart Trader
If you don’t see your Chart Trader once you have imported the Predator
Head to your NinjaTrader toolbar and you’ll want to select the 7th icon which is your Chart Trader Icon.
Select the Chart Trader option and your Chart Trader Panel will appear

Free Trial Not Enabling
If you have signed up for the Free Trial and you were able to import and set up but now you’re unable to enable.
Head to your “Help” tab on your NT8 Control Panel and select the “About” option.

You will receive the below popup from NinjaTrader displaying your Version, Machine ID, and Entitilements.
Simply COPY your machine ID and send in an email directly to [email protected].

Not Sure If You Have The Latest Version?
ALWAYS Restart NinjaTrader After Updating!!
You can always confirm which version of the Predator X Order Entry you have installed by right clicking on the chart, selecting “Strategies”

Once the properties open, you’ll want to double click on the “TradeSaberPredator” folder and select “PreadatorXOrderEntry”

And if you scroll down to Property 29, it will show you the current version of the Predator you have loaded

Enabling Tips 101
Please ensure to always enable a new strategy at the beginning of each day. All previous stored strategies need to be cleared if switching time frames or instrument. While your Strategy is enabled be sure to always monitor closely.
Always load the strategy by Right Clicking on the chart and selecting strategies.
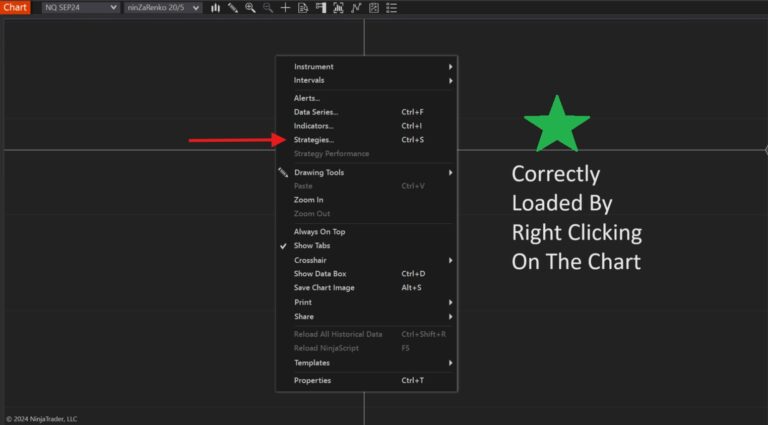
NEVER load by Right Clicking on the NT8 Control Panel and selecting Strategies, this will cause problems when enabling your strategy even if all of your Parameters and accounts are correct.
Once you have loaded your strategy you will need to be sure you check the Enabled Box on your NT8 Control Panel. Simply click on the box and a check mark will appear.
This is the step that fully enables your strategy for trading.

*Something To keep in mind* Always be sure to verify the Account listed under Account Display to ensure that you’re trading with the correct account.
**Please also ensure that you are only loading one instance per chart.
If you are trading multiple instruments, load them in different charts. Either in a new window or a different tab
*Always make sure to clear your control panel and load a new strategy at the start of each trading day to avoid any possible sync issues.
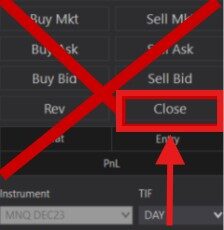
*Something to keep in mind* While your Strategy is enabled , do not use the regular NT8 controls
Due to connectivity issues with Brokers, Data Providers, Ninja Trader, or unforeseen circumstances. If you notice the Strategy is not responding to your actions, use the CLOSE Button on your Chart Trader panel to exit out of the trade.
This is the only time using the default NT8 Controls are suggested and should only be used as a last resort.
In this scenario, it is recommended to clear all strategies from your control panel and re load them again to avoid sync issues.
Strategy Templates NinjaTrader8
This video was made to help users understand how to SAVE, LOAD, or SEND strategy templates on NinjaTrader 8. We use the Predator X Order Entry as an example. But everything shown today can be applied to pretty much any other NinjaTrader Strategy.
Time Stamps
00:00 | Intro
00:15 | 1. Saving a Temple to the correct folder
01:25 | 2. Strategy Folder Missing? Do this
02:10 | 3. Saving a Template continued..
02:47 | 4. Loading Saved Templates
03:18 | 5. Reset to default settings
03:30 | 6. Creating Templates
05:05 | 7. Saving as Default
05:26 | 8. Sending/Posting your Templates
Predator X Order Entry Licensing Update
Full how to guide on installing & updating the new License Key update for Lifetime Members
Transfer Your Predator X License To Another Computer
Step By Step tutorial on transferring your Predator X Order Entry to another computer using the new License Key Update
Order Entry Buttons - Buy High / Sell Low - Auto QTY
NinjaTrader Semi-Auto Order Entries
Renko Reversal Trader
Utilizing Reversals with the Predator X Order Entry
Renko Charts & What Is A Reversal?
Using the Reversal Selector was mainly designed for use with Renko Style Charts.
Any type of Renko Charts can be used for Reversals but the one most commonly used, and the type used in this video is the NinzaRenko 64/16

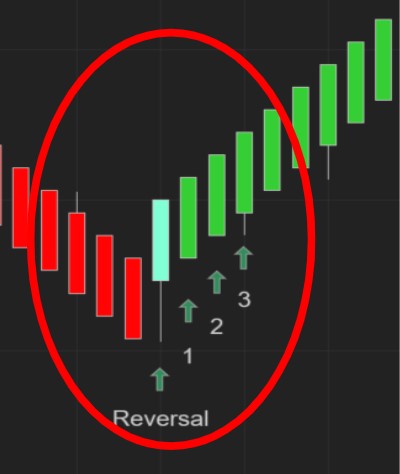
Alright, now that we’ve covered Chart set up, you might be asking yourself “What IS a Reversal?”
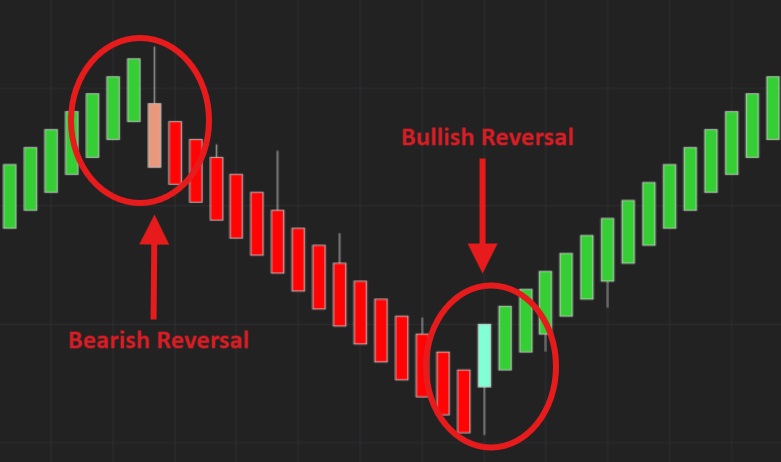
A Reversal is essentially your candles changing direction from their current trend to a new trend.
This can be seen as either “Bullish” or “Bearish” reversals
Bullish Reversals are when your bars are Red and have been in a “Short” position and a Green Reversal Bar shows up changing the position to a “Long”.
Bearish Reversals will be the opposite, these are when your bars are Green and have been in a “Long” position and Red Reversal Bar shows up changing the direction to a “Short”.
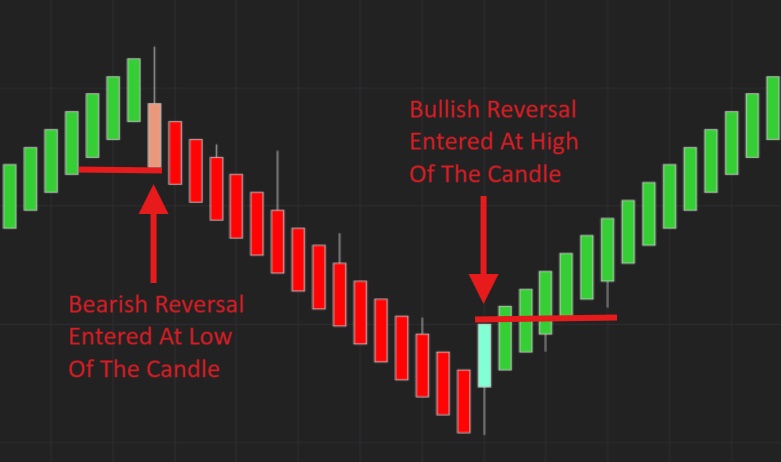
The Predator is designed to enter at the “Break” of either the high or the low of the candle.
A Bullish Reversal occurs when the current low is lower than its previous low and the current price closes higher than the previous close.
A Bearish Reversal occurs when the high of the current candle is above the high of the previous candle and the close of the current candle has to be below the close of the previous candle..
Customizing Your Reversal
To start customizing your Reversal Orders, ensure that your “Trade Reversals” option is selected. Checking this option signals to the Predator to enter at the Reversal as soon as one shows on the chart.
If this option is not selected, you will NOT be able to trade Reversals as this is telling the Predator that you’re NOT looking for reversals in your trades.

Once Trade Reversals has been selected, a new drop down will appear. The Reversal Selector parameter will allow you to define your Reversal Pattern using:
- Simple Reversal
- Wick Reversals

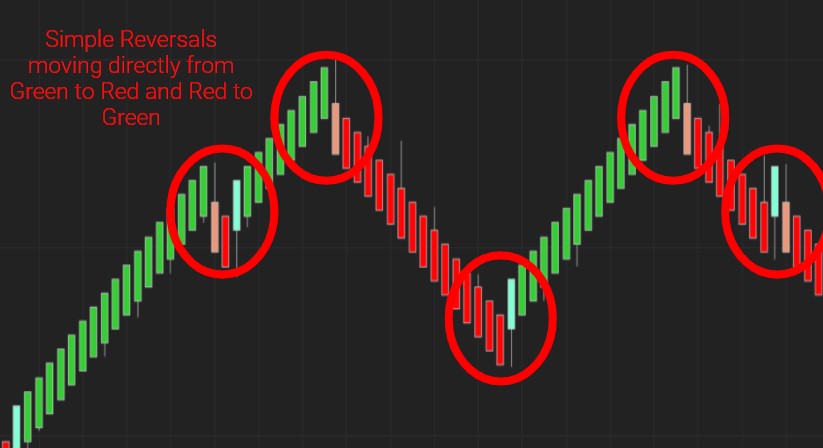
Simple Reversals refer to the first candle in a pattern moving from either a Bullish Reversal (Red to Green) or a Bearish Reversal (Green to Red). There are no specified conditions attached to this reversal pattern.
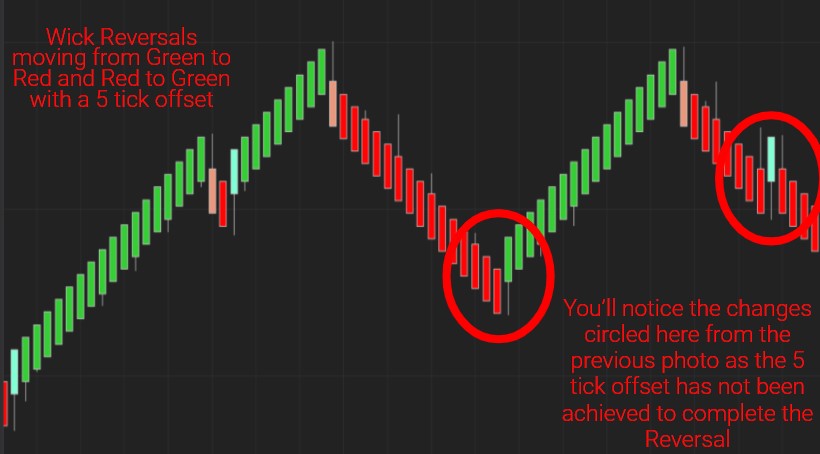
Wick Reversals use a tick offset to indicate how many ticks above or below the previous candle are needed in order to be considered a reversal.
Another option to customize your Reversals even more, is using the “Prior Bars Required” option.

The Prior Bars Required is used to indicate how many candles need to appear before your reversal in order to be a valid trade.
This can help to avoid choppiness within the market, but as always on the downside, you could miss some entries using this as well if there is a quick turn in the market.

To help further identify your Reversals, you can select the option to “Color Reversals”. This will allow you to set unique colors to reversal patterns to make them easily identifiable within your charts.
Once you checkmark the “Color Reversals” box, you will see 2 new dropdowns appear.

You can select colors for both Bullish and Bearish Reversal Bars using the dropdown. There are over 100 color options for you to choose from.
If you do not wish to have your reversal bars identified by a Color, or have chosen to not trade reversals, simply leave the Color Reversal box unchecked.
Additional Customizations Available For All Auto Entries
Along with all the other customizations you’ve completed for your Reversal, there are 2 more options available that will customize your Reversal as well as all of your other Auto Entries.

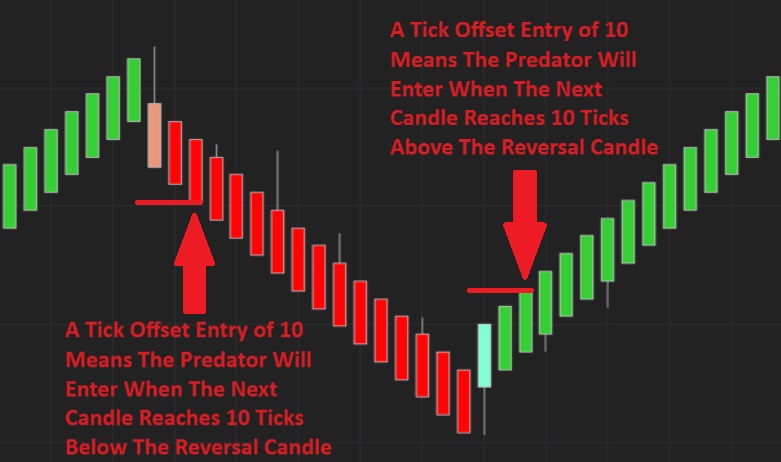
The Tick Offset Entry (REV/Engulf/Bars In A Row) identifies how many ticks above or below your Reversal the next candle has to break before it enters into a Trade.
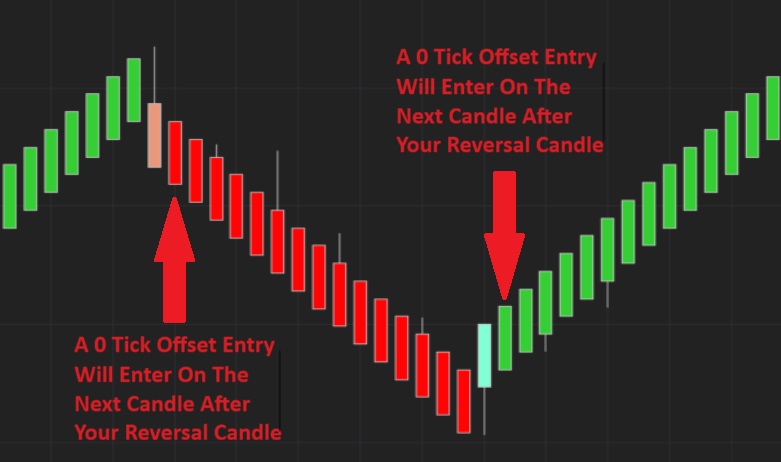
For example: setting your Tick Offset Entry at 0 will enter you into a trade on the very next bar after your Reversal Candle.
on the other hand, if you set your Tick Offset Entry to 10, the next candle has to reach 10 ticks above the high or the low of your Reversal Candle before it enters into a trade.
Confirmation Candles (Rev/Engulf) are used to establish to determine how many candles need to appear in the same direction after your Reversal Candle in order for you to enter a trade.
Anywhere from 0-10 confirmation candles can be used before a trade is entered.
For Example: A Confirmation Candle of 0 will enter at the break of the 1st Candle right after your Reversal Candle.
1 Confirmation Candle: Needs 1 candle to close after your Reversal Candle in the same direction before entering on the break of the 2nd Candle.
2 Confirmation Candles: Needs 2 Confirmation Candles to close in the same direction before entering on the break of the 3rd Candle.
SuperTrend Trader
Enter at the SuperTrend Break or Filter out other Auto entries
Getting Started With SuperTrend
Just like our other Auto Entries, It is important to note that in order we need to be in either Hybrid or Classic Predator Mode.
Hybrid is the mode most commonly used by Predator Members as this option allows your Manual and Auto Entries to be available at anytime.

To open up all of our options for the SuperTrend and begin customizing our entries, you’ll need to ensure the “Show ST Cross Button” option is selected under 02B. Auto Entries.
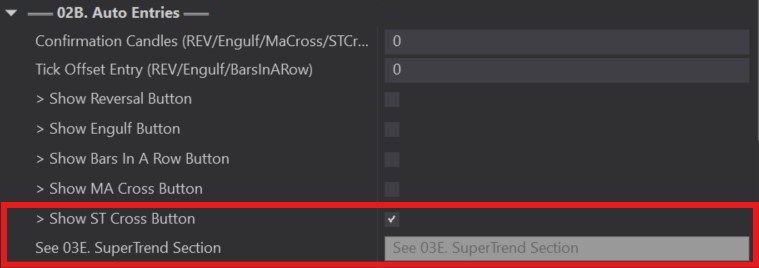
Once selected, you’ll see the note appear below the Show ST Cross Button “See 03E. SuperTrend Selection” so head down to that section and lets start customizing!
03E. SuperTrend - Cross & Filter For Auto Entries
Once you have arrived at 03E. SuperTrend you’ll see the below default options that have already been loaded into the Predator.
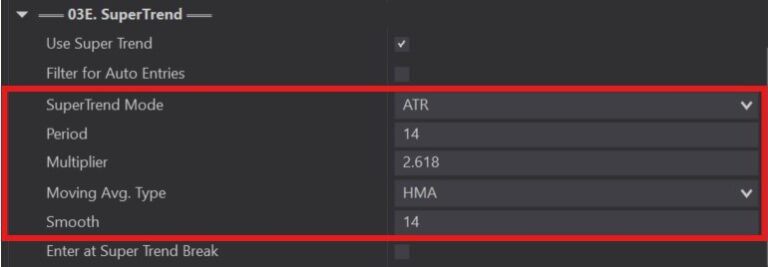
These default settings are the same as the original settings found in the NijaTrader App Share. This indicator was widely requested and has since been integrated into the Predator X Order Entry.
Shout Out to the original creator and if you’re interested in the original indicator: https://ninjatraderecosystem.com/user-app-share-download/tssupertrend/
As always even though these options are default, they can all be fully customizable by you and how you trade.
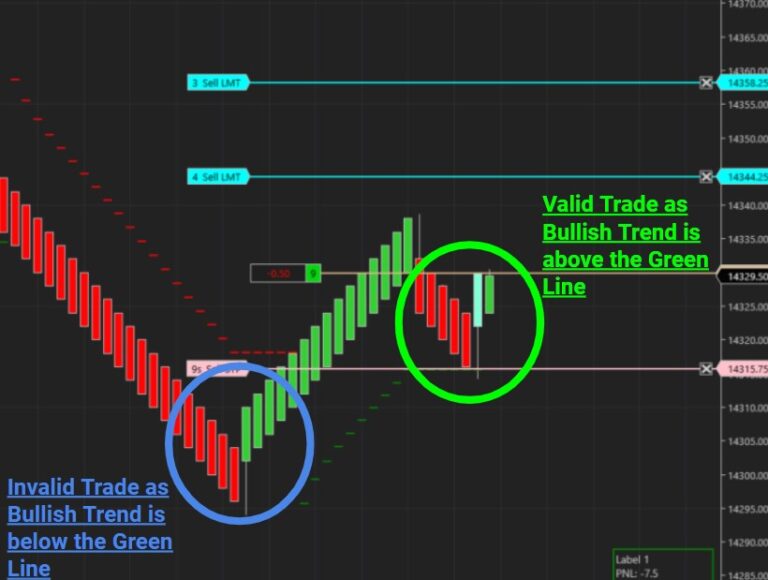
Now within the the 03E. SuperTrend option, you have 2 additional ways that you can enter using the SuperTrend.
The 1st we’re going to look at is Enter At SuperTrend Break. To use this option make sure to check mark the box!
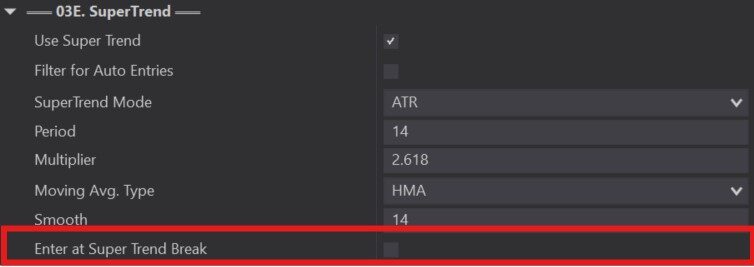
Enter At SuperTrend Break means we are only going to Enter at the SuperTrend when it Crosses.
This means we will only enter Long when our Candles cross the Red SuperTrend Line while the Green SuperTrend Line remains Below the Candles.
For Shorts this will be the opposite so we are only going to enter Short when our Candles cross Below the Green SuperTrend Line while the Red SuperTrend Line remains Above the Candles.

*To Keep In Mind* It is recommended to turn off your Reversals, Engulfing Bars, and Bars In A Row (Auto Entries) as they can interfere with your Super Trend by entering at an unexpected time.
**Use confirmation candles to delay your entry when entering using the Super Trend Break.
The 2nd option we’re going to look at is Filter For Auto Entries. To use this option make sure to check mark the box!
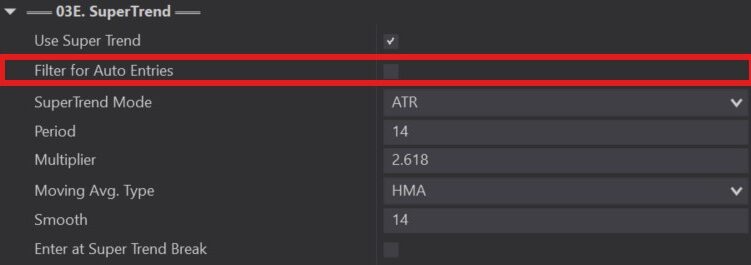
Whether you are using a Reversal, Engulfing Entry, Custom Signal, or Moving Average, this option is going to give you the ability to filter out those Trades using the SuperTrend.
This works by only taking Long Trades when the Green SuperTrend Line is Below the Candles or only taking Short Trades when the Red SuperTrend Line is Above the Candles.

SuperTrend Order Customization
While using the SuperTrend, you will have a couple of additional options when it comes to setting up your Orders in 04. Order Management.
First inside of our Stop Loss Type selection, you will see the SuperTrend_Stop.

This option will set our stop right at the SuperTrend when we enter the Trade.
Next, inside of the Trail Stop Type you will see the option for SuperTrend.

For this option, you will be able to fully Trail your Stop using the SuperTrend.

Once you select the SuperTrend as your Trail Stop Type, you will have 2 additional options to customize.
The first is the Trail Stop Offset 1 – This is going to Offset your Stop from the Super Trend Point.
So for Example: a value of 0 is going to put your stop directly on the SuperTrend Line. But if you put an offset value of 2, that means it is going to set our Stop 2 Ticks Below the SuperTrend when going Long and 2 Ticks Above the SuperTrend when going Short.

Your SuperTrend Trail Period 1 – is going to be how many Candles back the Predator is going to to look at the SuperTrend.
For Example: A value of 1 is going to set your Stop to the SuperTrend Value of the previous Candle while a value of 4 would set your Stop at the SuperTrend Value 4 Candles back.
Signals
Automating HalfTrend Indicator - Predator X Signal System
How To Automate The HalfTrend Indicator To Work With The Predator X Order Entry.
Downloading HalfTrend (And Other Signals)
To get started we need to head on over to the TradeSaber Discord.
If you are not a member yet, make sure you sign up so you’ll have access to the room you need in this video. The TradeSaber Discord has loads of free Indicators, Strategies, and an ever growing community!
Once you’ve arrived, head on down to the #Predadtor-Signals Room inside the Predator Series.
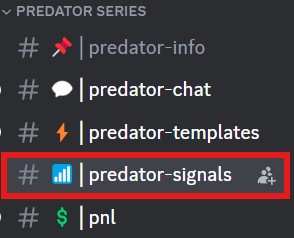
Inside the Predator-Signals room you will find Indicators and Strategies that have been developed and shared by members of our Predator Community. These files are available to download and integrate into your trading.
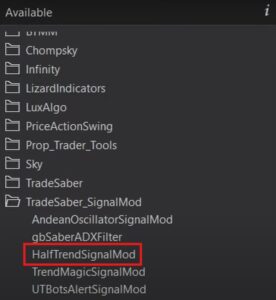
This video looks at The Half Trend Indicator Shown below.
**To keep in mind** Any Strategies that you download will need to be enabled in NinjaTrader BEFORE you enable the Predator.

Once you have found the Indicator or Strategy you would like to download, click on the ZIP file, download, and save. Detailed instructions on how to Download and save can be found in the Automating NinZa Indicators With Predator X Order Entry video above.
From here, we’ll head on over to NinjaTrader, right click on your chart, and open Strategies so we can view our Properties window.
On the left hand side, you’ll see your available indicator options to open with the Predator. Double click on the Indicator you want to use and we can start customizing.
IMPORTANT INFO -3rd Party Tags
In order to use our newly downloaded Indicator, we need to make sure it is compatible and we can use it with the Predator.
The first think we need is a NinjaTrader Draw Object. These usually come in the form of either an arrow or text, but can be other objects as well.
To determine if your Indicator is compatible, you’ll want to click on your signals and see what happens on your chart. If you see 4 circles appear around the signal, this means we can use this with the Predator. If you click on the signal and an array of lines appear on the chart, we are not able to use these.

Once we have determined that our Signals inside or downloaded Indicator are compatible, Left Click on any of the Signals, then Right Click and select Properties.

Inside the Properties for the Signal, THE MOST IMPORTANT information we need is the information shown inside the TAG.
The Tag will consist of some Text followed by a series of numbers as shown below.

In the left hand column, you will see a listing of the Tags and the numbers at the end of the letters should be increasing as you move down the list.
*Something to note* The numbers do not need to be in numerical order (i.e. 1,2,3,4,5…) they just need to be increasing (446,479,485,499…)
If the Tags are shown like this, it means they are most likely coded using the CurrentBars Method (“Tag” + “CurrentBars”). This method is what we need to be compatible with the Predator.

**Important Note** If you see Tags where the number is before the Letters, or they include some form of a date, these are NOT compatible with the Predator and you will be unable to use the Indicator.

For the Predator we need to focus on the Text part of the Tag before the Numbers *INCLUDING* any spaces that appear.
If you do not include everything that appears before the numbers, the Predator will be unable to read the Tag.

Click on the Tags in the left hand column to determine the Tag for the Longs & the Shorts. Be sure to write these down, or remember them as you’ll need them to input into the Predator Properties.

Using Entry Signal With The Predator
We downloaded our Indicator, determined it’s compatible with the Predator, and Identified our Tags. Now we’re ready to start customizing our Signal!
Right click on your chart and click on Strategies to head to our Properties.
Under 02B. Auto Entries, the Custom Signals option needs to be selected for your Signal options to appear.
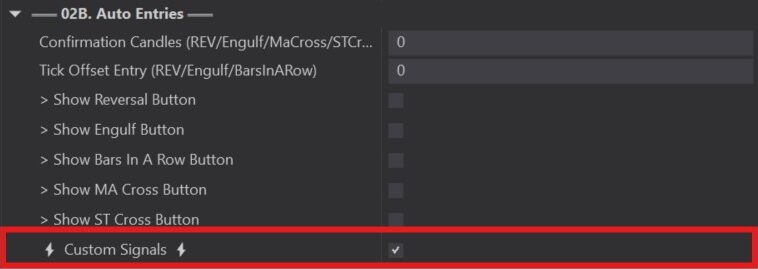
The first way we can utilize Signals is as an Entry Method.
For this you’ll need to select the Entry Signal option.

Once selected you will see some additional options including where we need to input our Tags from the Signal.
Just like we saw previously, our Long and Short Signal Tags need to be inputted EXACTLY as we saw them. The HalfTrend Indicator we are using had “isGreen” for the Longs and “isRed” for the Shorts.
*As A Reminder* Our Tag had no spaces but if you have any spaces in your Tags these MUST be included here.

Next we are moving on to Color Identifier. This option only needs to be selected IF our Tags are the same for the Longs & the Shorts.
A great example of this is the NinZa Wave Trend Indicator, the Tags for both the Longs & Shorts are the same only the colors are different.


Since we are using the HalfTrend Indicator and our Tags are different, we are going to keep the Color Identifier UNCHECKED.
Our last option is Bars Ago Entry. This just looks at how many candles to the left need to be formed AFTER our Signal. It comes as a default of 1, which is what most users use for their Strategy. This is also what we’re using for the HalfTrend Indicator.
For example: Bars Ago 1 will look 1 Candle to the Left, Bars Ago 2 will look 2 Candles to the Left, etc.
**Something to note** Bars Ago 0 should only be used if your Signal is printed on the same bar that is currently being formed. Otherwise for most Indicators you will typically need 1 Bar.
Once we’re all set up and our Order is set how we want it we’re good to go!
**Something to note** only use 1 Signal option at a time using the same Tags. If you are using Entry Signal do not include Exit & Filter with the same Tags as this can cause complications with your trading.
Below shows how our finished Entry Signal performs.

If we see an hourglass instead of a Checkmark, this means that our Tag has been inputted to the Predator incorrectly or in some cases that the system is still loading.
In most cases it is best to head back into our properties to review how our Tags were inputted.
Exit And Reverse Your Position In The Opposite Direction
An option a lot of Predator Users like to do, is to keep entering and only exit their position when a Reverse Signal appears in the opposite direction.
Instead of setting up an Exit Entry we can utilize our REV Button found on our NinjaTrader Control Panel.

Using our REV Button, we can either have the REV.OPP button with the Double Arrow selected, which will exit you out of your current position and re-enter you in the opposite direction once a Reversal Signal is formed. This is the Original Predator Button Method.
Or
If you click on the REV.OPP Button once, you will see it switch to a REV.REV Button. You’ll also need to click the Double Arrow Button to see this switch to a Closed Door. This option will exit you out of your trade as soon as a Reverse Signal appears in the opposite direction, and it WILL NOT re-enter you into a new position.

Filter Signal Validation System
The last way we can use Signals, is to Filter our other Auto Entries using our Signal.
For this option you’ll need to uncheck Entry Signal and have Filter Signal check marked as shown below.

In order to use the Filter Signal we have to have another Auto Entry selected. This option only works as an added condition to orders that are already set into place.
For example. We have our Reversal Auto Entries selected and we add Filter Signal. This means our order is forming based on what we have set up for our Reversal and now it will look for the added condition of needing our Signals to be in the right direction of the Trend.
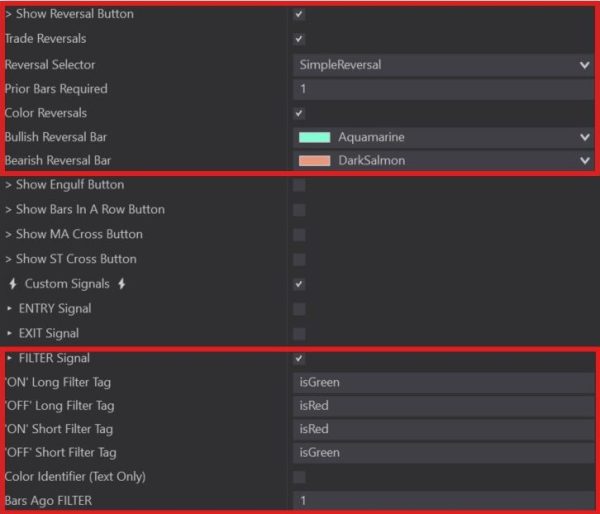
An easy way to also think of this, is as an ON/OFF switch, if the Switch is ON we can take trades, if the Switch is OFF we cannot take trades.
Since we have already established for our Half Trend Indicator that “isGreen” is for our Longs and “isRed” is for our Shorts, we’re going to look at how we use these in the Filter Entry.
If we think of the ON/OFF Sewitch again, think of when you’d want your Longs to turn On & Off and when you’d want your Shorts to turn On & Off.
To turn on our Longs we’d want to have our “isGreen” Tag and we’d want our Long Filter to turn off when it switches to a Short “isRed”.
To turn on our Shorts we’d want to have our “isRed” Tag and we’d want our Short Filter to turn off when it switches to a Short “isGreen”.
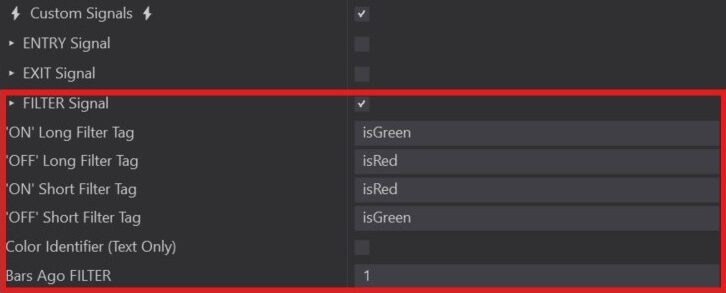

If you ever find that your Filter Signal does not match up with your charts Signal, you can manually adjust these by clicking on either the Long or the Short Signal.
Modify Indicators For Custom Signals
How you can Modify Indicators for Custom Signals you can use with the Predator X Order Entry
NinZaRenko Engulfing Trader
Engulfing Bar Set Up & Explanation On The Predator X Order Entry
NinzaRenko Charts & What Are Engulfing Bars
The Engulfing Bar Entries inside the Predator were mainly designed for use with the NinzaRenko style charts can be used and customized with a variety of other similar charts such as the UniRenko Bars, ADTS RV Bars, or KingRenkos just to list a few.
Engulfing Bars are identified as a rejection of a trend reversal. Buyers are moving to push the price in the opposite direction but inevitably prices continue following the same trend and do not Reverse.
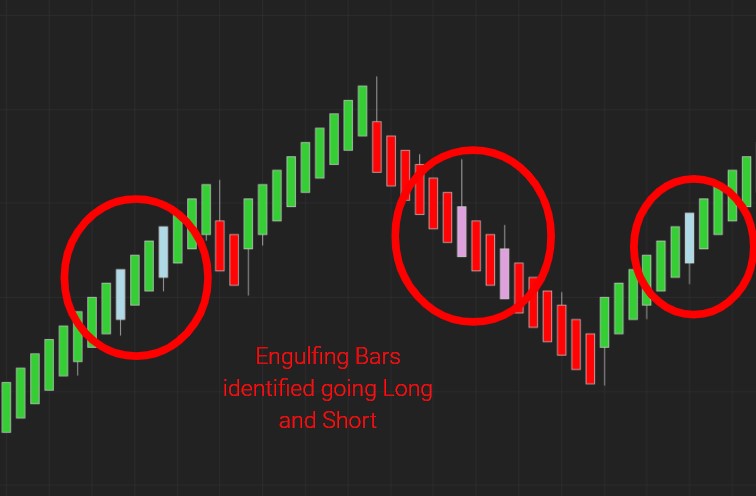
This is where our Engulfing Bar Entry Method comes in, we can use this Auto Entry to help identify trend continuation and enter a trade based on this information.
Setting Up Our Engulfing Bars
It is important to note that in order to Trade Engulfing Bars we need to be in either Hybrid or Classic Predator Mode.
Hybrid is the mode most commonly used by Predator Members as this option allows your Manual and Auto Entries to be available at anytime.

To use and customize the Engulfing Bars, simply check the “Show Engulf Button” and then check “Trade Engulfing Bars” as shown below.

Ways To Customize Engulfing Bars
Now that we move into customizing our Engulfing Entries, we will be taking a deep dive into the below options.

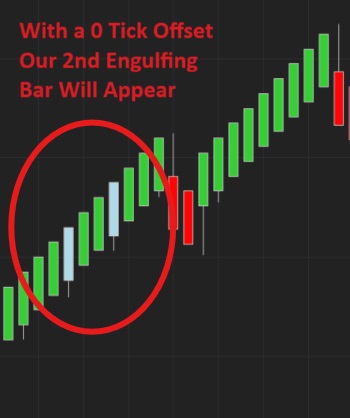
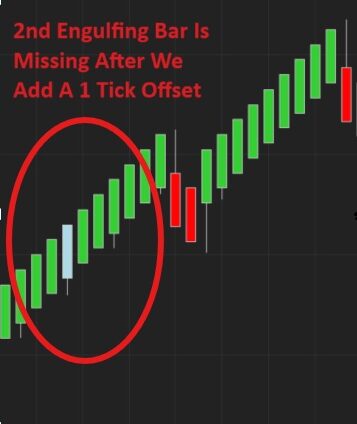
The Engulfing Bar Tick Offset is used to indicate how many ticks above or below your engulfing candle has to be from the previous candle to be considered an Engulfing Candle.
In the below example, we added a 1 Tick Offset to our Engulfing Bars and now our 2nd Engulfing Entry is no longer valid as the low of the current candle is equal to the low of the previous candle.
Before we get into the Bars Since Reversal option, lets first look at why this could be important.
Engulfing Bars that form close after a Reversal tend be much more accurate and carry more momentum than Engulfing Bars that form 15-20 Candles down the road.
Now the Bars Since Reversal option will put a limit on how many bars are allowed to form after a Reversal, and our Engulfing Bar must appear within that period.

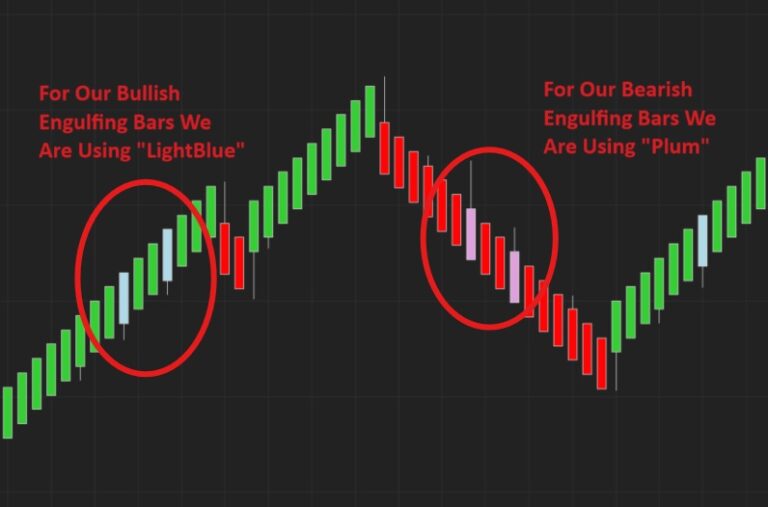
The same as our Bullish and Bearish Reversals, you can customize Green and Red Engulfing Bars to have specific colors. Select the Color Engulfing Bars box and using the new dropdowns choose any color of your choice.
Tick Offset Entry (Rev/Engulf/MA Cross/ST Cross) Is used to define our Trades entry point.
For Example: A Tick Offset Entry of 0 means our Trade will enter at the break of the next candle’s high or low as long as it is at least equal to the previous candle.
But a Tick Offset Entry of 5 would mean that in order for the trade to be valid, the next Candle would have to break at least 5 ticks above or below the previous Candle.

Confirmation Candles (Rev/Engulf) are used to add extra “Confirmation” and indicate how many Candles need to appear in the same direction after your Engulfing Bar in order for you to enter a trade.
Anywhere from 0-10 Confirmation Candles can be used before a trade is entered.

Additional Filter - Trades Per Direction
An additional option that can be helpful for the Engulfing Bars is the Trades Per Direction.
Head down to Option 7 – Additional Filters, and checkmark this box to show your options. Scroll down to Trades Per Direction and ensure this box is check marked as well.
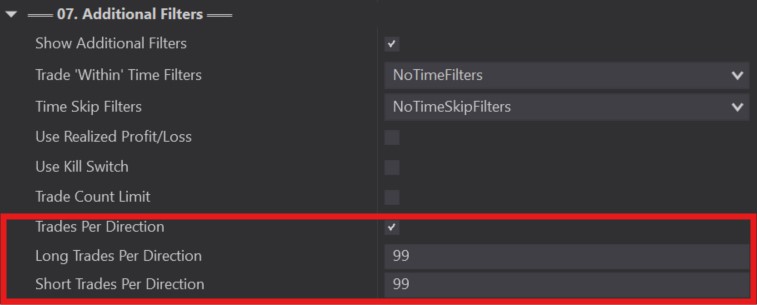
This option is used to define the amount of Trades taken Per Direction. It is set at the default of 99 to take all the valid Trades.
Some users only like to trade the 1st Engulfing Entry that appears per direction, if this is the case for you you’ll want to change both your Longs and your Shorts to a value of 1.

Now that you have defined if you’re limiting your Trades in each direction, you’re probably looking for a way to reset.
You will have the option to either Reset Opposite Direct or Reset After Reversal. Reset After Reversal is the most common here as this will reset your Trades Per Direction count after every Reversal that appears.
Moving Average Crossover Trader
How To Set Up & Utilize The Moving Average Using The Predator X Order Entry. New update includes VWAP & a 3rd MA filter
Getting Started With The Moving Average
Just like our other Auto Entries, It is important to note that in order we need to be in either Hybrid or Classic Predator Mode.
Hybrid is the mode most commonly used by Predator Members as this option allows your Manual and Auto Entries to be available at anytime.

Inorder to get started with your Moving Average or any other Auto Entry, you’ll need tocheck mark the box next to the Auto Entry you want to use. For this example, we will select the Show MA Cross Button.
Once selected, you’ll see the prompt to head down to a specific subsection within Indicators. Ours shows the “See 03A. Fast/Slow MA Selection”

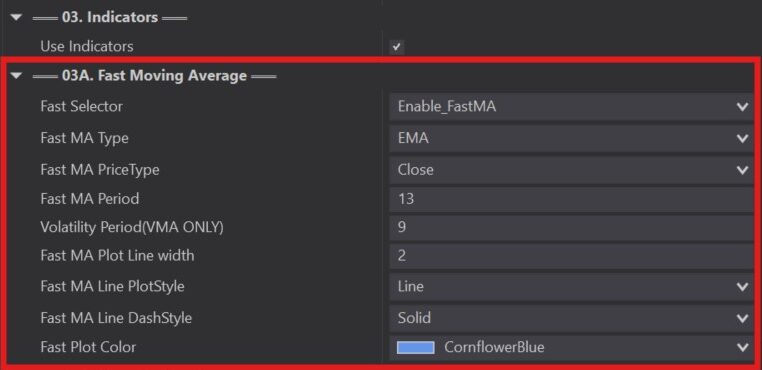
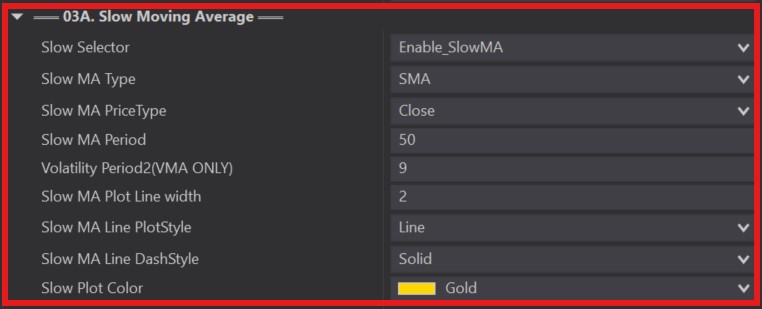
Once you arrive at 03A. you will see a section for the Fast & Slow Moving Averages.
A Fast Moving Average is an Average calculated over a short period of time for a specific type. Using the Fast Moving Average will take Long Entries when your Bullish Reversal closes above your Moving average and will take Short Entries when your Bearish Reversal closes below the Moving average.
A Slow Moving Average on the other hand is an Average calculated over a long period of time for a specific type. Using the Slow Moving Average will take Long Entries when a Bullish Reversal closes above your FastMA and your FastMA is above your SlowMA, and will take Short Entries when the Bearish Reversal closes below you FastMA and your FastMA is below your SlowMA.
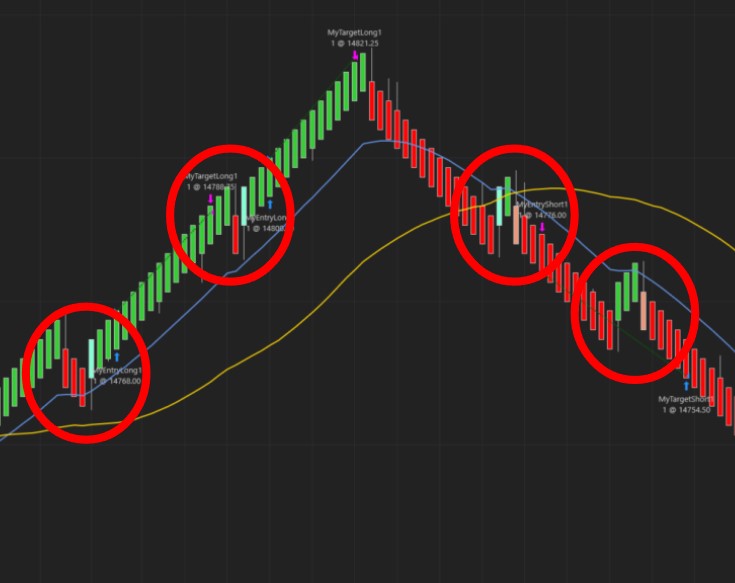
Longs: FastMA is above the Slow MA and Bullish Reversal closes above the FastMA
Shorts: FastMA is below the SlowMA and Bearish Reversal closes below the FastMA
Customizing Your Moving Average
You Fast & Slow Moving Averages are completely customizable and to work the way you want for your strategies as well as to be identified however works the best for you on your chart
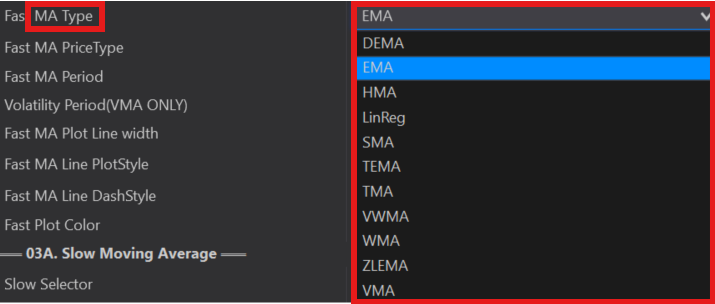
Starting with your MA Type, you’ll have a variety of Moving Averages to select from and these options will be the same for both the Fast & Slow sections.
For more information on each individual MA Type please refer to NinjaTrader 8’s official Website. https://ninjatrader.com/support/helpGuides/nt8/NT%20HelpGuide%20English.html?moving_average_-_variable_vma.htm
Next you’ll see the MA Price Type. This option refers to how your Moving Average is calculated.

The MA Period allows you to indicate how many candles back you want your strategy to look.
Please refer to NinjaTrader’s Official Website for more information on Volatility Period in VMA. https://ninjatrader.com/support/helpGuides/nt8/NT%20HelpGuide%20English.html?moving_average_-_variable_vma.htm

The MA Line covers 4 main customizations:
- MA Plot Line Width – How thick you want your line to appear on the chart
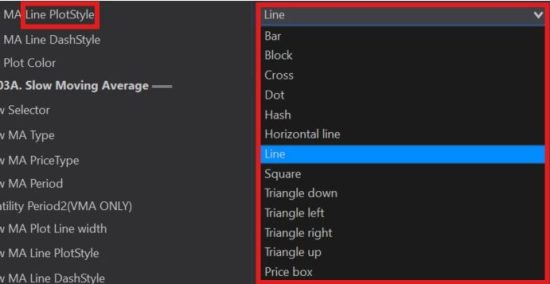
- MA Plot Line Style – The type of line you want to appear
- MA Line Dash Style – The choice of either a Solid or a Dashed line option
- Plot Color – Contains over 100 colors to choose from to color in your line
These MA Line options allow you to customize a combination that makes the chart work the best that it can for you.
**Plot Color options not shown since there are so many


MA Cross Entries
One way you can use Moving Averages in your strategy is to Enter at MA Cross. To utilize the Enter at MA Cross, ensure you have this box checked.
Selecting Enter at MA Cross is simply telling the Predator to start entering trades when the Fast Moving Average crosses the Slow Moving Average.
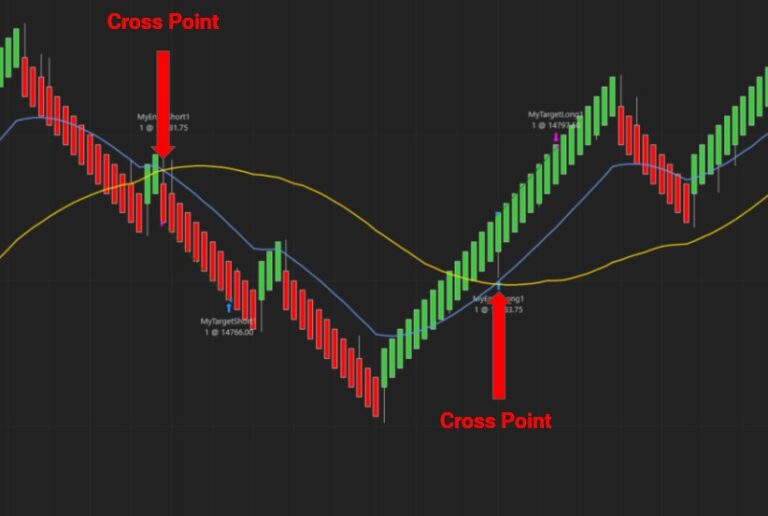
Looking at the example below you’ll see 2 valid MA Cross trade:
On the left we have a valid Short Trade as the Fast MA (Blue Line) has crossed BELOW the Slow MA (Yellow Line)
And on the right we have a valid Long Trade as the Fast MA (Blue Line) has crossed ABOVE the Slow MA (Yellow Line)
When using the MA Cross option, it is important that we take a look at our Confirmation Candles in our 02B. Auto Entries.
Keeping your confirmation candles at 0 means that you will enter a trade as soon as the Fast MA crosses the Slow MA even if the candle has not finished closing.
This can cause some issues if there is a Reversal while the candle is still forming and then it never ends up crossing.
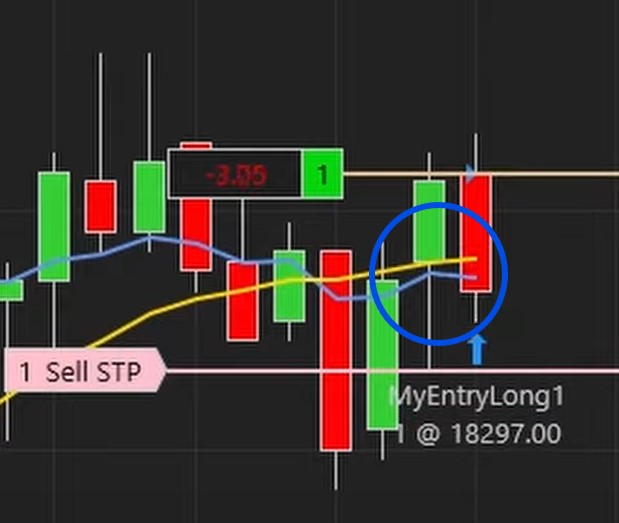
Adding some Confirmation Candles will ensure that you at least have 1 bar close after the Crossover. This will just help add some confirmation for you that your cross has fully happened instead of entering will the candle is still forming.
REV/REV Button (Exit At Reversal Candle)
A new option integrated into the Predator X Order Entry, is the ability to exit trades on the Opposite Reversal using the REV.OPP Button on your NinjaTrader Control Panel.

Within the REV.OPP button, you can either have your trade exit on the opposite reversal with an entry in that opposite direction (Original Predator Button Method)
If you click on the REV.OPP Button once, you will see it switch to a REV.REV Button. This option will exit you out of your trade as soon as a reversal candle is detected in the opposite direction.

You will also see a small button next top the REV Button which will include 2 additional options for your Reversal.
If you have the Double Arrow option selected, this will Re-Enter in the opposite direction once a Reversal has taken place.

If you have the Door option selected, this will only take you out of your trade once a Reversal has taken place but WILL NOT Re-Enter in the opposite direction.

Filter Out Other Auto Entries With Moving Average
To use your Moving Average to filter out other Auto Entries, ensure you DO NOT have your Enter at MA Cross selected.
This option needs to remain unchecked so that all of your Moving Average customizations can be used as a filter.
How our Moving Averages work as a filter is if you have your Fast Moving Average enabled, it is only going to allow Long Trades to happen when when our valid entries are ABOVE the MA and Short Trades to happen when our valid entries are BELOW the MA.
For Example:

Using your Slow Moving Average will be the opposite, it is only going to allow Long Trades to happen when when our valid entries are BELOW the MA and Short Trades to happen when our valid entries are ABOVE the MA.
For Example:

If you have both Moving Averages enabled as filters, this will add 2 conditions that need to be met in order for a trade to become valid.
Our Fast MA will need to be BELOW our Slow MA and the price needs to be BELOW both MA’s in order to be a valid Short Trade.

For our Longs it will be opposite, our Fast MA will need to be ABOVE our Slow MA and the price needs to be ABOVE both MA’s in order to be a valid LONG Trade.

Automating NinZa Indicators - Predator X Order Entry
How To Use NinZa Indicators With The Predator X Order Entry.
What We Need To Automate With The Predator
Similarily to what you’ll see in the Automating HalfTrend Indicator video, in order for us to use Indicators such as theis WaveTrend one from NinZa, we need to make sure it is compatible and we can use it with the Predator.
The first think we need is a NinjaTrader Draw Object. These usually come in the form of either an arrow or text, but can be other objects as well.
To determine if your Indicator is compatible, you’ll want to click on your signals and see what happens on your chart. If you see 4 circles appear around the signal, this means we can use this with the Predator. If you click on the signal and an array of lines appear on the chart, we are not able to use these.

Next you’ll want to double click on anyone of your Signals to open the “Drawing Objects” Properties.

Inside the Properties for the Signal, THE MOST IMPORTANT information we need is the information shown inside the TAG.
The Tag will consist of some Text followed by a series of numbers as shown below.

In the left hand column, you will see a listing of the Tags and the numbers at the end of the letters should be increasing as you move down the list.
*Something to note* The numbers do not need to be in numerical order (i.e. 1,2,3,4,5…) they just need to be increasing (446,479,485,499…)
If the Tags are shown like this, it means they are most likely coded using the CurrentBars Method (“Tag” + “CurrentBars”). This method is what we need to be compatible with the Predator.

**Important Note** If you see Tags where the number is before the Letters, or they include some form of a date, these are NOT compatible with the Predator and you will be unable to use the Indicator.

For the Predator we need to focus on the Text part of the Tag before the Numbers *INCLUDING* any spaces that appear.
If you do not include everything that appears before the numbers, the Predator will be unable to read the Tag.
A quick way to copy the tag is to use Snipping Tool to select the area you want to extract, and then head over to a Text Extractor Website. This cuts down on any errors that may happen from typing out the Tag yourself or missing any spaces.
This is the best Text Extractor I have found: https://brandfolder.com/workbench/extract-text-from-image

Another step we have for this Indicator in specific is since the Tags are the same for both the Long and the Short, we need to look at the Color used for each so we can input those into the Predator.


Setting The Predator
Now that we’ve extracted and jotted down our Signal information, let’s head into our Predator Properties and start customizing our Strategy.
Right click on your chart and click on Strategies.
Head down to 02B. Auto Entries, and from here you’ll need to check mark the Custom Signals option for your Signal options to appear.

The first options were going to look at inside Custom Signals is the Entry Signal Option.
This option is going to use our Signals to enter Trades for us as per the order customizations we create.

You’ll see inside of our Entry Signal where we need to input our Tags that we looked at earlier in our Draw Objects.
Just like we saw previously, our Long and Short Signal Tags need to be inputted EXACTLY as we saw them. The NinZa Wave Trend Indicator we are using had “ninZaWaveTrendPro.marker.” for the Longs and “ninZaWaveTrendPro.marker” for the Shorts.
*As A Reminder* Our Tag had no spaces but if you have any spaces in your Tags these MUST be included here.

Now, as we noted when looking at the Drawing Object Properties, both of our Tags for the Long & the Short are the same.
We need to add the colors into our Predator Strategy in order to identify them separately. To add Color make sure to check mark the Color Identifier box and you’ll see a new drop down under both your Long & Short Tags.
Select the color that was used for the tags found in the Drawing Objects Properties. In the case of NinZa’s Wave Trend, they used Dodger Blue for the Longs & Hot Pink for the Shorts. (Refer to the photos in the previous section to review the Drawing Object Properties.
*As A Reminder* your Tag, & Color need to be inputted into the Predator EXACTLY as they are. This includes, Spaces, Capitals, Lowercase, would need to be copied exactly, and we also need to note if this is a Text or a Shape. Notice how below everything has been copied into the Predator EXACTLY as we had seen it inside the Indicator.

1 more step we need to take when we have Tags that are the same, is we have to Identify the Entry Object Type.
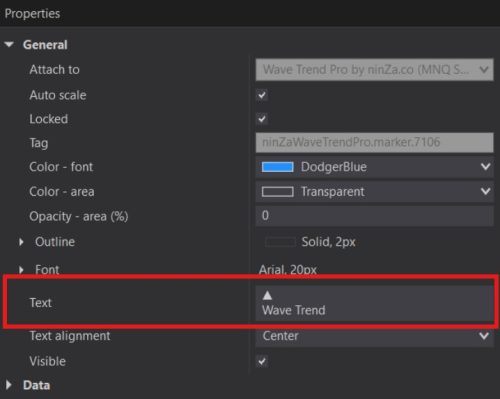
Your Entry Object can be either Text or Other Object (Objects like arrows, triangles, etc.)
As you can see from below, the NinZa Wave Trend shows in Text what they use as a Signal, so since they use Wave Trend as their Signal, we would choose Text in our Entry Object Type.
Our last option is Bars Ago Entry. This just looks at how many candles to the left need to be formed AFTER our Signal. It comes as a default of 1, which is what most users use for their Strategy. This is also what we’re using for the HalfTrend Indicator.
For example: Bars Ago 1 will look 1 Candle to the Left, Bars Ago 2 will look 2 Candles to the Left, etc.
**Something to note** Bars Ago 0 should only be used if your Signal is printed on the same bar that is currently being formed. Otherwise for most Indicators you will typically need 1 Bar.
Lorem ipsum dolor sit amet, consectetur adipiscing elit. Ut elit tellus, luctus nec ullamcorper mattis, pulvinar dapibus leo.
Once we’re all set up and our Order is set how we want it we’re good to go!
**Something to note** only use 1 Signal option at a time using the same Tags. If you are using Entry Signal do not include Exit & Filter with the same Tags as this can cause complications with your trading.
Validation System
Once you enable your Strategy, you’ll want to take a look at the top left hand corner of your screen for your Signal Validation System.

You’ll see our Longs & Shorts are shown highlighted with their color. Both Signals have check macrks next to them showing us that the Predator is able to read the Signals.
If you see an hourglass instead of a check mark next to the signal, this means the Predator cannot read the Signals and you’ll need to head back into your Properties to review our Tags, Colors, & Text.
Enter At Break Of Candle
Inside the Predator Properties you might have noticed an additional option that we haven’t covered yet, Enter At Break Of Candle.

In order to enter Short, you Entry Candle must break BELOW the Previous Candle.

Longs would be the complete opposite, your Entry Candle must break ABOVE the previous Candle.

Like we have discussed in previous videos, you can always utilize your REV-OPP / REV-REV button on your NinjaTrader Control Panel to exit your trades with or without re-entering in the reverse.
Sync Stop / Auto QTY - New Version
Updated Predator X Order Management utilizing the new Chart Trader Panel Updates from December 2024
Trail Stops With Predator X Order Entry
How to configure your trail stops with the Predator X Order Entry for NinjaTrader.
Unsynced - Original
Step-By-Step Breakdown On Setting Up Your Own Custom Orders From Beginning To End.
Order Management Overview
To get things started we’re going to take a look at our 04. Order Management Section.
Everything customized within the Order Management section, is going to be the same regardless of any Entry type we select.
These include our Auto Entries – such as Reversals, Engulfing, SuperTrend, etc. Our Manual Entries – Which are our Buy High & Sell Low Buttons or Enter Long & Enter Short.
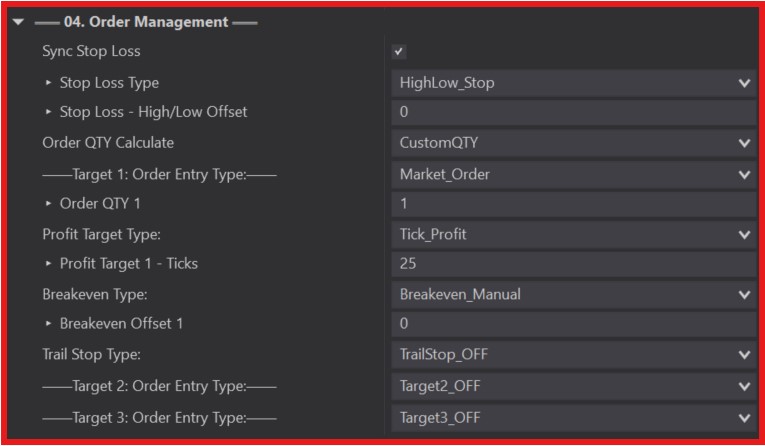
First thing we can look at in this section, is out Targets. Each section we discuss below will be broken down by the options included inside the Targets.
There are 3 different Targets that can be set and when you enter a Trade, all 3 of your Targets are going to get set at the same time.
You Targets can all be managed independently from one another which includes having 3 different Profit Targets, Trail Stops, Breakevens, etc. But they are all going to be entered at the Same Time.
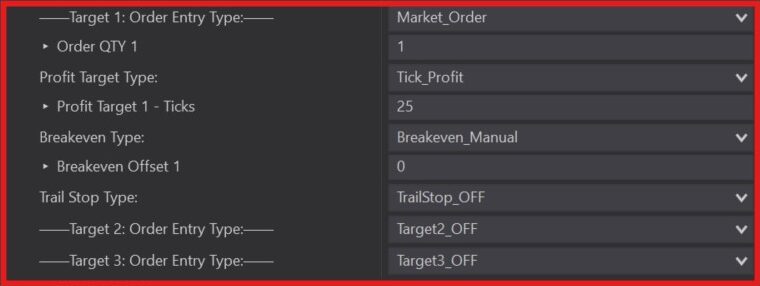
Each section we discuss below will be broken down by the options included inside the Targets.
Order Entry Type
The 1st option you’ll see inside the Target, is the Order Entry Type.
Your Order Entry Type is going to be the Entry Style that enters you into a Trade. You will have 4 Entry options to choose from:
- Market Order
- Limit Order
- Reversal Break Limit
- Target Off

Market Order – Sends a market order when your entry conditions are met. This is the default Entry Method on all Targets and is what is recommended so you do not miss a trade.

Limit Order – Sets an Order based on the current entry price when your conditions are met.
To use the Limit Order, you will need to indicate your Offset, Cancel Limit Entry & Order Qty.
Limit Order Offset – offsets your entry from the current price.
So for example, an offset of 0 is going to enter your Trade as soon as your conditions are met. But if you’re waiting for lets say some sort of a pullback, you can set a negative value that will enter into a Trade that many Ticks below the current price when going long or above the price when going short. A positive value would put your entry price beyond that current price that will typically lead to you entering right away.
Cancel Limit Entry After X Bars – Is going to cancel your Trade when the specified number of bars has passed if your entry conditions have not been reached.
Reversal Break Limit – Will set a limit order based on the most current Reversal Bar that has formed. This option is commonly used by users looking for a much bigger pullback or Reversal Pivot Point.
Reversal Break Limit will use the same Offset, Cancel & Qty options as the Limit Order Offset.

Target Off – Will eliminate the Order from your Strategy.
Custom Order Qty
Once we have selected how we want to Enter the Trade, we can choose our Order Qty for that specific Target.

To select your Order Qty, you will have 2 different options the Predator will use to set your Position Size.
- CustomQTY
- AutomaticQTY

CustomQTY – Choosing this option Will allow you to set a custom Qty to each specific Target. Your Position Size will then be a sum of all your Quantities. The more Targets you add, the more your Position Size is going to be.
So for example: If you have 2 Targets set and each has an Order Qty of 1, you total Position Size will be 2. Your 1st Target is 1 and your 2nd Target is 1.
If your second Target has an Order Qty of 3, then your total Position Size is 4. Your 1st Target is 1 and your 2nd Target is 3.

AutomaticQTY – On the other hand, is going to let the Predator Automatically calculate the Position Size for us.
The formula for this is based between the Entry and the Stop Price, makes a calculation based on your Risk Per Trade and Automatically Calculates the correct position size so you only lose approximately that much when you exit a Trade.

**Something To Keep In Mind** Using the AutomaticQTY is NOT the same as a Kill Switch. Because of Slippage, Tick Size, & Value, you’re likely to lose a little bit more or potentially a little bit less than your Risk Per Trade.
This is only used to keep a consistent Risk on each Trade.
Another option within AutomaticQTY is Max Position Size, here you are able to indicate your Max Position Size which is a total between all 3 Targets. This can be helpful if you are ever in a scenario where your Stop is very Small but you’re entered into a much larger Position than you were expecting.

**Something To Keep In Mind** You must have a minimum Position Size of 1 per Target regardless of the Position Size you inputted.
So for example: if you put a Max Position Size of 2 but you have 3 Targets running, the Predator will still set your Max Position Size to 3.

As you continue to add Targets, if you take a peek back up at your Max Position Size you will see new % Allocation Order‘s being added.
How these percentages work is, once the Predator Automatically Calculates your total position size, it is going to allocate a percentage of that to each Target.
It will always allocate Order 1 first, followed by Order 2, and the balance will be set to Order 3.

So for example if we set our Risk Per Trade to 250, have a Max Position Size of 20, Allocate 50% to Order 1, 30% to Order 2, the balance 20% Allocated to Order 3

Profit Targets
Next up we have Profit Target Type. This will just be where your Profit Target will be set.
Within the Profit Target Type there are 4 different options available to you:
- Tick_Profit
- RR_Profit
- ATR_Profit
- No_Profit

Tick Profit – Will use ticks to determine your profit. This is the most common Profit Target method used.
Profit Target 1 – Ticks – Is where you can customize how many Ticks away from your Entry Price you want your Trade to Enter.

So for example – Profit Target 1 – Ticks of 25 will set your entry 25 Ticks away from the current price. 50 Ticks, will set your entry 50 Ticks away from the current price.

RR Profit – Also referred to as Risk to Reward Profit, takes your Entry Price & your Stop Price, multiplies those by your indicated Profit Target 1 – RR amount to set your Profit.
Profit Target 1 – RR – Is essentially your amount of “Risk” for each Target.

So for example: a Profit Target 1 – RR of 1 is giving you a 1 to 1 Risk to Reward. Whatever the Distance is from the Entry Price to the Stop Price will be the same as the Entry Price to the Profit Target.

A Profit Target 1 – RR of 2 is giving you a 2 to 1 Risk to Reward. So here whatever the Distance is from the Entry Price to the Stop Price will be doubled from the Entry Price to the Profit Target.

ATR Profit – Or your “Average True Range” It takes the Range of a period of time and takes the average True Range of that Period. It is essentially looking for the highest Average Bar Range.
Profit Target 1 – ATR Multiplier – If we look at our Profit Target the ATR Multiplier will take your current ATR Price and Multiply it by that amount, and it will add it to your Entry Price.

When you use any sort of ATR option on the Predator you will see an additional ATR option appear in the Indicators Section to define your ATR Period.
ATR Period – Is the Period your ATR is looking at. The Predator comes with a default of 14 which is the most common Period users look at, but you can customize this to anything you want.

So for example: an ATR Multiplier of 1 will set your Profit Target at whatever your Current ATR Price is from your Entry Price.
If we set our ATR Multiplier to 2, it is going to Multiply your ATR by 2.

No Profit is our last option. This option will be used if you want to get stopped out using a Trail Stop or a Breakeven. Or if you want to be exiting manually using the Quick Start Buttons.
Stop Loss
By default, Stop Orders are located at the top of the Order Management section. And this is because by default, the Predator comes enables with the Sync Stop Loss option selected.
Sync Stop Loss means that no matter how many Targets you have enabled, they will all be set at the same Stop Price. For most users, this is the option that they choose, they want their Stops set to the same Price and only their Profit Targets to change.

If you do not want to have your stops Synced, simply uncheck this option and you will see your Stop Losses move into each Target.
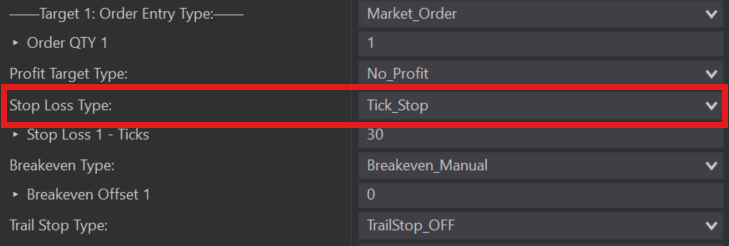
Within the Stop Loss Type, the Predator has 4 different types available.
- High Low Stop
- Tick Stop
- ATR Stop
- SuperTrend Stop

High Low Stop – Means if we are entering into a Long Trade, it’s going to set your Stop at the Bottom of the Previous Candle.
If we’re going Short, it is going to set your Stop at the Top of the Previous Candle.

Within The High Low Stop we also have the option to set an Offset. This will set a Tick Offset from the High or the Low of the Candle.
So for example: A High Low Offset of 5 will set your Stop 5 Ticks from either the High for the Candle if going Short or the Low of the Candle if going Long.

Tick Stop – Is where you can set how Many Ticks away from your Entry Price you Stop will be set at.
Stop Loss Ticks – Is where you’ll input your Tick amount.
So for example: a Tick Stop of 30 is 30 Ticks either Above or Below your Entry Price.

ATR Stop – Similar to your Profit Target, it is going to take your ATR Period, multiply the value at the time of Entry and will set that as your Stop Loss.
Stop Loss – ATR Multiplier – Is where you will indicate your Multiplier

So for example: an ATR Stop with a Multiplier of 1.5, is 1.5 times your ATR at the time of Entry set as a Stop Loss.

SuperTrend Stop – When we select the SuperTrend Stop Loss it is going to populate the SuperTrend Parameters in our Indicators section and use these to set our Stop. Selecting this option will also populate the SuperTrend onto your Chart.

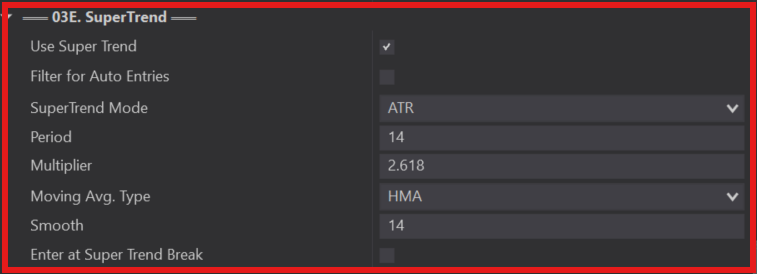
*As a Reminder* The default parameters that are currently in the Predator are the same as the original SuperTrend Indicator found on Ninja’s Workplace.

So for example: your Stop when going Long will be set at the Green SuperTrend Line Below the Bars, and when you’re going Short, it will be set at the Red SuperTrend Line Above the Bars.

**Something to keep in mind** When using the SuperTrend Stop, you must make sure your Entry is in the same direction as your SuperTrend or it can cause your Stop being set much later as a precaution.
Buy High / Sell Low Auto Position Size
Moving away from the Predator Properties, we’re going to take a look at the Buy High & Sell Low Manual QuickStart Buttons.

When we select the Green Eye Button next to Buy High, you will see the entry line generate onto the Chart. It will automatically set your Entry Line at the High of the Candle and our Stop Line at the Low of the Candle.
You can manually drag these lines higher or lower depending on where you want to have your Entry and your Stop.

In the left hand corner of the screen you will also see a summary of your Risk Per Trade, as well as all of your Long & Short Entries, Stops, Ranges, & Current Position.

To make your Trade Live, simply click on the Buy High Button so that it becomes grayed out and your off!

Your Sell Low Button will work exactly the same way only this time you will focusing on your Short Entries instead of your Long Entries.
Breakeven
Alright, back in the Properties, when you load the Predator by default, you are going to see a Breakeven option within each of your Targets.
You will have 2 different ways to calculate your Breakeven:
- Breakeven Tick
- Breakeven RR
- Breakeven ATR
To set your Breakeven Manually, you need to complete these steps for each Target as they are managed individually from one another.

Your Breakeven options are calculating the Range that you need to go into Profit before your Breakeven moves up.
Whether you select Tick or RR your options are going to be the same, the only difference is your Breakeven Tick is looking for a Specific Tick amount to be hit before the Breakeven moves up, and your Breakeven RR is looking for a Specific Risk to be hit before your Breakeven moves up.

Profit Target Type – Tick/RR – This option is where you will indicate how many Ticks you need to be into Profit or the total Risk you need to hit.
Breakeven Offset – This option allows you to Offset your breakeven a specified number of Ticks away from your entry price. A positive Offset moves your Breakeven Entry more into Profit and a Negative Offset moves your your Breakeven further away from profit.
To help ensure you are always hitting into Profit adding a small Positive Offset is recommended.

**Something To Keep In Mind** If at any point you want to adjust your Breakeven Manually while Trading, you can select your B/E QuickStart Button for the Target you want to move, and adjust your Breakeven where ever you would like.

Lorem ipsum dolor sit amet, consectetur adipiscing elit. Ut elit tellus, luctus nec ullamcorper mattis, pulvinar dapibus leo.

Lorem ipsum dolor sit amet, consectetur adipiscing elit. Ut elit tellus, luctus nec ullamcorper mattis, pulvinar dapibus leo.

Lorem ipsum dolor sit amet, consectetur adipiscing elit. Ut elit tellus, luctus nec ullamcorper mattis, pulvinar dapibus leo.

Trail Stops
Last but not least we are onto Trail Stops. If you want a deep dive into each of the Trail Stops please make sure to check out this video:

Trail Stops are Stop Loss Orders that based on your conditions, will automatically adjust its stop price as the market moves. The Predator cutrrently has 5 different Trail Stop options to choose from, in order to not make this video too long, we are only taking a quick look at the options.
- High Low
- ATR
- Parabolic SAR
- Tick Trail
- SuperTrend

High Low – This is the most common Trail Stop Type used. The High Low Trail Stop works by trailing each previous candles High when you are going Long or Low when you are going Short.
Trail Stop Offset – This is going to Offset how many Ticks away from the High or Low of the Candle we are going to Trail.
Trail High/Low Period – The Period within the Trail Stop is how many Candles back your Stop is going to Trail. For example entering a Period of 2 will Trail your Stop 2 Candles back from the most current, while entering a value of 0 will Trail the current candle.

Trail Stop Auto Trigger Type – Very similar to our Breakeven, you need to select how far into Profit you need to be in order for your Trail Stop to be Triggered. You can select between either Tick Distance or RR Distance.
Trail Stop Profit Trigger (Ticks/RR) – This is where you will indicate the Specified Amount into Profit you need to be in either Ticks or RR.
So for example: Setting a Trigger of 20 Ticks means that we need to be 20 Ticks into Profit before our Trail Stop will begin Trailing.

If you ever want to stop Trailing you Stop, you can click on the Active QuickStart Button of the Order you want to stop Trailing. You will no longer be Trailing when the button shifts to a White and says Trail.

ATR – or Average True Range – Is the average of True Ranges over a period of time. ATR is a volatility based measurement.
Offset – Indicating a number here will offset where the stop will be set set at.
Show ATR – Show ATR is an extra option to have your ATR shown on your chart. Selecting this will create a separate panel to show it.
ATR Period 1 – This is the ATR Period you are looking at, it is set to the most standard default of 14.
ATR Multiply 1 – Is the Multiplier it will use to set your stop. For example: Whatever ATR number comes up in period 14, it will multiply that number by 1.5 to set your stop.
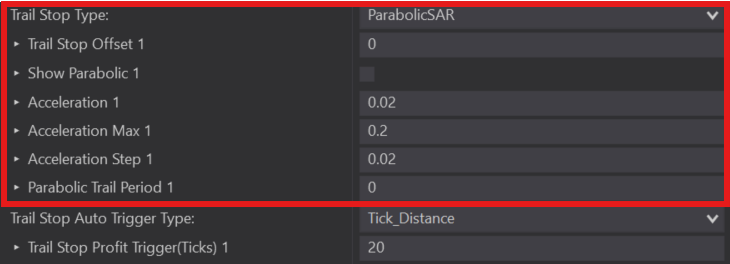
Parabolic SAR – Commonly used to find Trends and Reversals.
Offset – Indicating a number here will offset where the stop will be set set at from the Parabolic SAR
Show Parabolic – Same as ATR, you will have the option to show the Parabolic SAR on your chart. This will create a separate panel to show it.
Acceleration – Default starting Acceleration is already set at 0.02
Acceleration Max – Default Max Acceleration already set to 0.2
Acceleration Step – Default Acceleration Step set at 0.02
Parabolic Trail Period – Indicates which period you are looking at. 0 being the most current price, and 1 being the previous of the current

Super Trend – Will set your Trail Stop based on the SuperTrend Line.
Tick Offset – (How many Ticks away from the actual Super Trend Price)
Super Trend Trail Period – How many candles back you want to trail (By default will be set to 1)
Trigger – How much the price has to move in either direction before the trail starts, to trail immediately set your Trigger to RR and the value at 0.01.
Tick Trail Explained
Now for the option that seems too cause the most confusion among users, I wanted to give it it’s own place to shine and really break it down.
Tick Trail – This will trail your stop by a set number of Ticks and can be run in Real Time or when Candles Close.

Update Intra Bar – If this option is selected it is going to continuously update your Trail Stop Frequency & Size while the Candles are forming. This options means it is updating in REAL TIME and Does NOT wait until a new candle is formed. This option will work very similarly to an ATM.
Offset – Can offset the location of your stop by this amount of ticks.
Because we are already dealing with tick size using this trail method, it is recommended NOT to use this option. However, you can if you still want to.
Trail Frequency (How Often) – is how many Ticks into Profit the price has to be, in order to move your Trail Stop again. So for example: a Frequency of 5 means every time you move 5 Ticks into Profit, it will move your Trail Stop 20 Ticks up from that point.
**Something To Keep In Mind** The Trail Frequency calculation is only update WHEN the Bar Closes.
Trail Size (Stop Distance) – This is how far away from the current price the Stop will be set at once your Trail Stop starts. So for example: a Stop Distance of 20 will set your Trail Stop 20 Ticks into Profit.

Trail Stop Auto Trigger Type & Trail Stop Profit Trigger (Ticks/RR) will work the same as all other Trail Stop options.
Scale Into A Trade Using Predator X Order Entry
– Using the ADD buttons to add to your position.
– Manually or Automatically Add to your position.
– Help Prevent DCA rule breaks when trading with certain Prop firms (Apex)
How The Predator Uses Signals
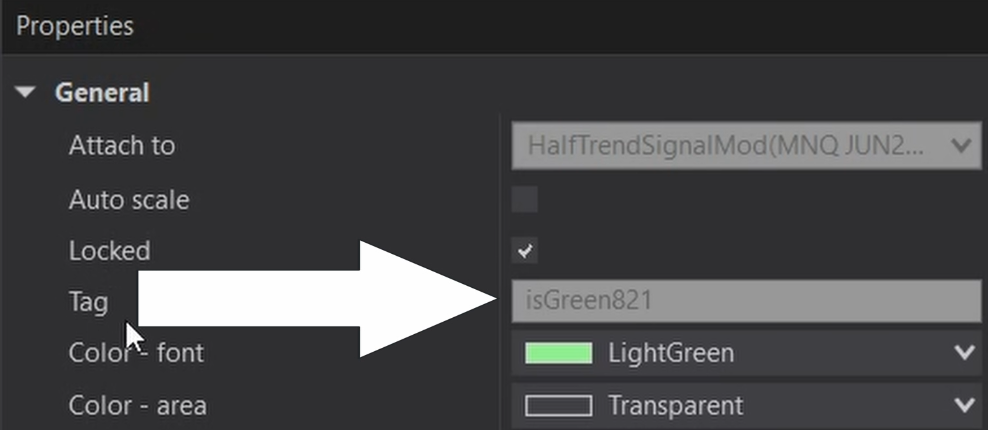
The Predator can use 3rd party signals to enter trades. It must be a 3rd party Ninja Trader Draw object. Usually in the form of a TEXT or ARROW. (NOT Lines).
- It must use the code: “TAG” + CurrentBar
- The CurrentBar code tells us what bar we are currently on.
- We type everything right up to the CurrentBar (Any Text that happens before the number. Include any spaces if there are any after the last character and the number. If no space exists, then do not add a space).
- We do NOT need a color identifier if the Long and Short Tags are different. It is only needed if they are the same.
Taking a Long Time To Load?
The Predator can enter trades based on 3rd party draw objects. Indicators or strategies that create hundreds or thousands of signals can cause a lag on the system because it will take much longer to read all of these signals that are not directly built in and optimized within the Predator.
- This conditions is mainly present with indicators that create hundreds/ thousands of signals.
- Many days loaded on the chart.
- Small bar size -> Means more bars -> more signals to read.
Although you can test historical trades with custom signals. It is advised to have ‘Show Historical Trades’ off and load the least number of days as possible. Specially when running in real time. This will reduce potential lag.
What to do if it is taking a long time to load when using custom signals:
- Load only 1 or 2 days.
- or load 500 bars or less if possible.
Important Notes: MTF indicators / Trading with Tabs
MULTI Time frame indicators.
- MTF indicators that print signals do not work with the Predator.
- All Indicators must print within the same timeframe.
Trading using multiple TABS
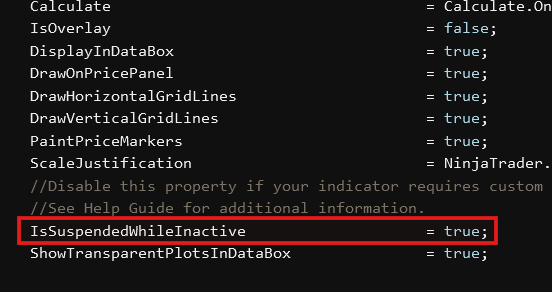
- Most indicators, by default are coded with IsSuspendedWhileInactive set to true. This saves CPU but will have a negative effect on Signals. It will only print signals on the displayed charts.
- It will appear as if it misses trades if the chart is hidden in the background in a separate tab. But it will start taking trades again when it becomes the main displayed chart.
- Ensure either your indicator IsSuspendedWhileInactive is set to false. Or for better practice, have a separate chart displayed for each separate signal.
Create Your Own Custom Signals:
Use *Almost* Any Indicator To Filter Trades
How to use Strategy Builder to create your own custom signals that can be used alongside the Predator X Order Entry to filter out your Auto entries.
00:00 | Intro
00:52 | What Is A Filter Signal / How To Use
03:00 | Setting Up Strategy Builder
10:10 | Setting Up Signals The Predator
15:34 | Reading Your Filter Signals
18:38 | Running On The Chart
22:51 | Outro
Create ENTRY Signals On Strategy Builder
How to create ENTRY Signals using Strategy Builder
00:00 | Intro – Building Buy/Sell Signals
01:32 | 1. Conditions and Actions
04:02 | 2. Draw Object with Tag (IMPORTANT)
08:59 | 3. Loading Strategy Builder on the chart
10:10 | 4. Check the Drawing Object Properties TAG
11:03 | 5. Loading the Predator
Modify Indicator Code For Custom Signals
How to Modify your 3rd party Indicator using Custom Signals
00:00 | Intro
01:05 | Copying and creating a new indicator
01:48 | Saved Templates LT and non LT
05:09| Plan out what we are doing
06:17 | Customizing options
10:10 | Finding and working with a plot
12:55 | Coding the signal
17:53 | Custom Signals with the Predator X Order Entry
1. Check Your Validation System
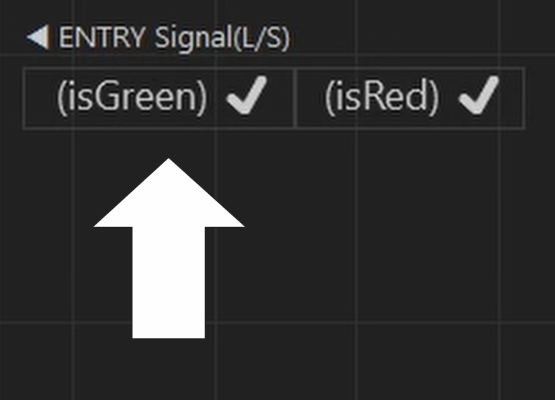
What does the top left hand validation system say? Is there a check mark or an hour glass?
- If there is an hour glass. Make sure to type in the TAG exactly how it is shown in the inidcator properties. It must show a check mark or else it is not reading properly.
2. Check When Your Signals Are Printed
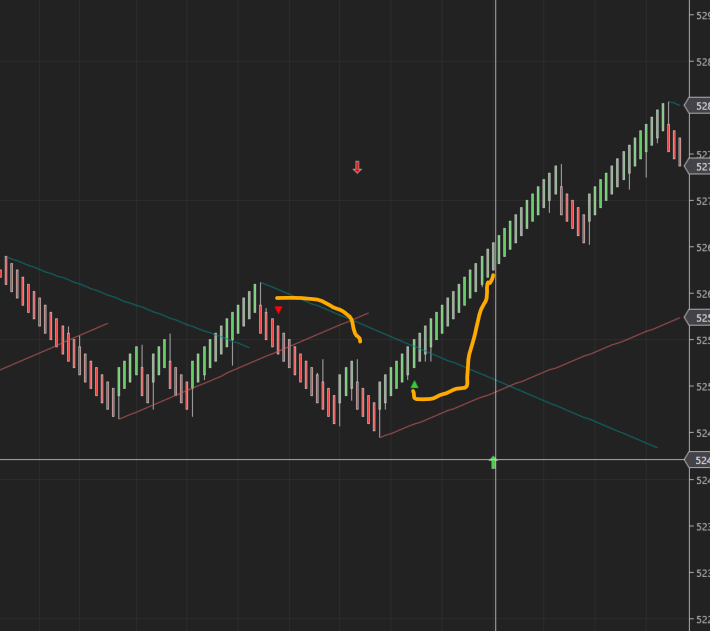
When does your indicator print the Signal? Most indicators will print as soon as the bar closes.
- Does your indicator print as soon as Bar Closes? or does it print several candles later?
- Some 3rd party indicators may not print the proper signal until after the move has happened. (See example above). The triangle is the NinjaTrader Draw Object. The arrows are to show which bar it actually created the triangle on. Some indicators are unfortunately just created to look good when loaded, but serve no real purpose.
- This can cause it to appear like the Predator missed it. But in reality, there was no signal at the time. The indicator just printed later.
3. Have Bars Ago Entry Changed From 1?
Bars Ago Entry. Has this been changed from 1?
- A value of 1, means it looks at the candle immediately to the left.
- A value of 2 means it looks at 2 candles to the left.
- A value of 0 is reserved only for those inidcators that print a signal on the same bar while it is still forming. – A great majority of indicators will need a value of 1 to work the best.
- Historical back testing may look different with show Historical Trades turned on. It is recommended to turn it off and run it in playback or Sim to understand how it works
4. Using Any Built In Indicators Or Filters
Do you have any indicator or additional filters? If so, try turning everything off. Reload a new blank template and just put the signals back on and try to run it by itself.
- Does it work without any other filters? slowly put a filter back one by one until you find what is causing the problem.
5. Something To Watch Out For
All steps followed.
- Have checkmarks in the validation system?
- Bars ago set to 1?
- No other filters?
- Prints the signal immediately after the bar closes but still not picking up the signal?
Ensure the developer did not add a number to the signal “Tag” before the current bar code.
- For example: “TAG1” + CurrentBar: In this case, we would include the 1 in the Predator because it is part of the Tag and not the CurrentBar
Example of Indicator with a number inside the tag (Screenshot 1)
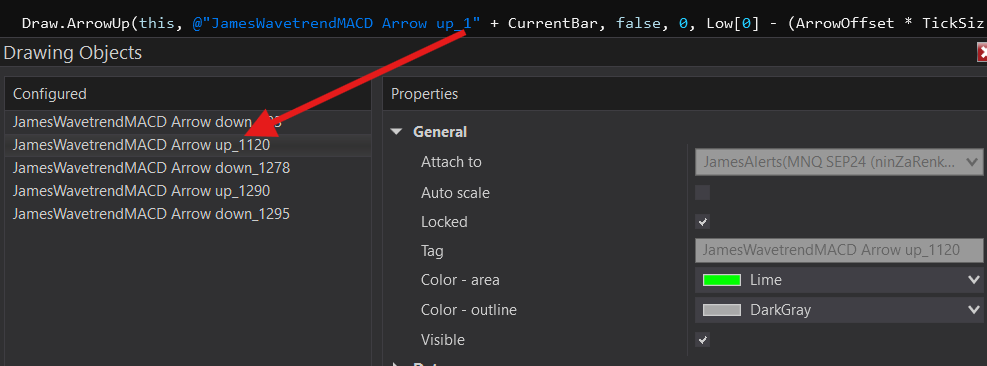
Example of how this tag should be typed inside the Predator (Screenshot 2)

Here are steps you can take to figure out if your indicator has been coded this way:
- If it is open source. Take a look at the code. See screenshot 1 above.
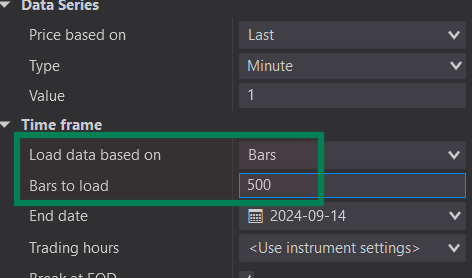
- If the code is locked. Right click on the chart -> Data Series -> Load data based on BARS (See screenshot 3) -> Load only 500 bars. – Check your indicator signal properties again.
- Is the number after the Tag under 500? or is it in the thousands? If you only loaded 500 bars but the number is in the thousands. This likely means your developer added a number to the TAG part to help identify the signal style for the indicator. Simply include that number in the Predator and it should work. (See screenshot 2)
6. If You're Still Having Issues
In the case you’re still have problems with the Signal System. Please contact [email protected], but please enure to send the pollowing information:
- Please send a screenshot of your ENTIRE screen (Includes: Validation System, Chart, & Chart Trader Panel)
- Double click on the Signal and send a screenshot of the ENTIRE Object Property Window. With a separate screenshot of each Signal Tag being used.
- Screenshots of your ENTIRE Predator Properties.
(And please send your saved xml. template: Watch this video for how to send xml)
Strategy Builder Entries - Predator Order Management
How to convert your Strategy Builder Trading Bot so that it can be used with the Predator X Order Entry.
00:00 | Intro – Why use the Predator
02:40 | Overview
04:05 | Strategy Builder – Stop/Profit Targets Moves Back
04:53 | Converting Strategy Builder to Print Signals
08:24 | Signal TAG + Loading the Predator
16:40 | Running The Predator
Create FILTER Signals On Strategy Builder
How to create FILTER Signals on Strategy Builder
00:00 | Intro
00:17 | 1. Getting Started With Builder
03:20 | 2. LONG-ON Conditions (Set 1)
06:00 | 3. Create our Signal
08:44 | 4. LONG-OFF Conditions (Set 2)
12:57 | 5. SHORT-ON/OFF (Set 3 & 4)
15:19 | Loading our Filters and Object TAG
16:50 | Loading The Predator X Order Entry
18:19 | Signal Validation System
Automating NinZa Indicators
How to automate NinZa Indicators with the Predator X Order Entry
00:00 | Intro
00:39 | 1. What we need to automate with the Predator
03:00 | 2. Setting the Predator
05:17 | 3. Validation System
06:28 | 4. Running Without Enter At Break Of Candle
08:38 | 5. Running With Enter At Break Of Candle
11:41 | 6. Automating your own NinZa Signals
23:37 | 7. NinZa to Filter other Auto Entries
29:06 | 8. Indicators that CANNOT be used
